 Suzuki Grand Vitara: Using the Transmission

5-Speed Automatic
Transmission
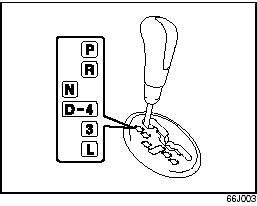
D: 5-speed automatic transmission mode. 4: 4-speed automatic transmission mode.
The 4-speed mode is suitable for the following driving conditions:
• Driving on hilly, winding roads. – You can drive more smoothly with less frequent
gearshifting.
• Going down a steep hill. – Some engine braking is provided.
NOTE: With the transfer switch in the “4L LOCK” position, the 5-speed automatic transmission will remain in the 4-speed mode.

Gearshift lever
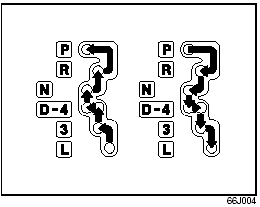
The gearshift lever is designed so that it can not be shifted out of the “P” position unless the ignition switch is in the “ON” position and the brake pedal is depressed.
 WARNING: Always depress the brake
pedal before shifting from “P” (Park) (or “N” (Neutral) if the vehicle is stationary)
to a forward or reverse gear, to help prevent the vehicle from moving unexpectedly
when you shift.
Use the gearshift lever positions as described below:
P (Park)
Use this position to lock the transmission when the vehicle is parked or when starting the engine. Shift into Park only when the vehicle is completely stopped.
 WARNING: If you have a 4-wheel
drive vehicle, never leave the transfer switch in “N” (Neutral) position when parked.
Otherwise the vehicle may roll even if the transmission is in Park.
R (Reverse)
Use this position to back the vehicle from stop. Make sure that the vehicle is completely stopped before shifting into Reverse.
N (Neutral)
Use this position for starting the engine if the engine stalls and you need to restart it while the vehicle is moving. You may also shift into Neutral and depress the brake pedal to hold the vehicle stationary during idling.
D (Drive)
Use this position for all normal driving. With the selector in “D” range, you can get an automatic downshift by pressing the accelerator pedal. The higher the vehicle speed is, the more you will need to press the accelerator pedal to get a downshift.
4 (Low 3)
Use this position for driving on moderate uphill and downhill gradients. The engine braking effect on moderate downhills can be used in this position. The transmission shifts up only to 4th gear.
3 (Low 2)
Use this position to provide extra power when climbing hills, or to provide engine braking when going down hills.
L (Low 1)
Use this position to provide maximum power when climbing steep hills or driving through deep snow or mud, or to provide maximum engine braking when going down steep hills.
NOTE: If you move the gearshift lever to a lower gear while driving faster than the maximum allowable speed for the lower gear, the transmission will not actually downshift until your speed drops below the maximum speed for the lower gear.
CAUTION: Be sure to take the following precautions to help avoid damage to
the automatic transmission:
• Make sure that the vehicle is completely stopped before shifting into “P” or “R”.
• Do not shift from “P” or “N” to “R”, “D”, “4”, “3” or “L” when the engine is running
above idle speed.
• Do not rev the engine with the transmission in a drive position (“R”, “D”, “4”,
“3” or “L”) and the rear wheels not moving.
• Do not use the accelerator to hold the vehicle on a hill. Use the vehicle’s brakes.
Emergency shifting out of “P” (Park)
If you are unable to shift the transmission out of Park in the normal manner, see “If You Can Not Shift Automatic Transmission Gearshift Lever Out Of “P” (PARK)” in the INDEX for what to do.

Manual Transmission
Starting off
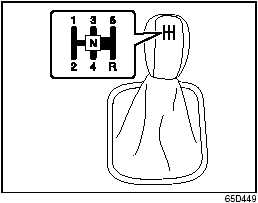
To start off, depress the clutch pedal all the way to the floor and shift into 1st gear. After releasing the parking brake, gradually release the clutch. When you hear a change in the engine’s sound, slowly press the accelerator while continuing to gradually release the clutch.
Shifting
All forward gears are synchronized, which provides for quiet, and easy shifting. Always push in the clutch pedal fully before shifting gears. Make sure the engine speed does not rise into the red zone of the tachometer.
 WARNING:
• Reduce your speed and downshift to a lower gear before going down a long or steep
hill. Downshifting will allow the engine to provide braking. Avoid riding the brakes
or they may overheat, resulting in brake failure.
• When driving on slippery roads, be sure to slow down before downshifting. Large
and sudden changes in engine speed may cause loss of traction, which could cause
you to lose control.
• Make sure that the vehicle is completely stopped before you shift into reverse.
CAUTION:
• To help avoid clutch damage, do not use the clutch pedal as a footrest while driving
or use the clutch to keep the vehicle stationary on a hill. Depress the clutch fully
when shifting.
• When shifting or starting off, do not race the engine. Racing the engine can shorten
engine life and affect smooth shifting.
 Engine Block Heater (if equipped)
Engine Block
Heater (if equipped)
The engine block heater will help you start the engine more easily in very cold
weather (–18°C (0°F) or below). To use the engine block heater: 1) Turn off ...
 Using the Transfer Switch (if equipped)
Using the Transfer
Switch (if equipped)
Your vehicle is equipped with a four-mode full-time 4x4 system. You can use the
transfer switch to select any of the four modes: N, 4H, 4H LOCK, 4L LOCK.
...
See also:
Wireless remote control
The wireless remote control can be used to lock and unlock the vehicle
from outside the vehicle.
Vehicles without smart key system
1 Locks all doors
2 Pushing and holding: Sounds alarm
3 Unlock ...
Voice Recognition
The voice recognition system uses commands to control the system and dial phone
numbers.
Noise: The system may not recognize voice commands if there is too much background
noise.
When to Speak: ...
Reverse ®)
The vehicle must be stationary when position
R is selected. ...
