 Mercedes-Benz GLK-Class: Resetting triggered NECK-PRO head restraints
![]() WARNING
WARNING
For safety reasons, have the NECK-PRO head restraints checked at an authorized Mercedes-Benz Center after a rear-end collision.
![]() WARNING
WARNING
When pushing back the NECK-PRO head restraint cushion, make sure your fingers do not become caught between the head restraint cushion and the cover. Failure to observe this could result in injuries.
Resetting the NECK-PRO head restraints requires a lot of strength. If you have difficulty resetting the NECK-PRO head restraints, have this work carried out at a qualified specialist workshop, e.g. an authorized Mercedes-Benz Center.

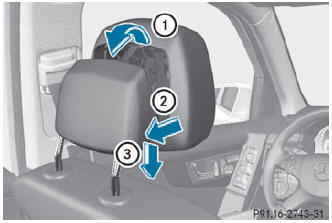
- Press the base of the NECK-PRO head restraint cushion back in the direction of arrow 2 as far as it will go.
- Push the NECK-PRO head restraint cushion down into the guide in the direction of arrow 3 as far as it will go.
- Firmly fold the NECK-PRO head restraint cushion back in the direction of arrow 1 until it engages.
- Repeat this procedure for the second NECK-PRO head restraint.
 NECK-PRO head restraints
The NECK-PRO head restraints increase protection to the driver's and front passenger's
head and neck. To this end, the NECK-PRO head restraints on the driver's and front-passenger
seat ...
 Seat belts
...
See also:
Parking brake lining
1. Drive the vehicle at a speed of
approximately 22 mph (35 km/h).
2. With the parking brake release button
pushed in, pull the parking brake lever
SLOWLY and GENTLY (pulling with a
force of ...
Measuring and adjusting air pressure to achieve proper inflation
Check and, if necessary, adjust the
pressure of each tire (including the
spare) at least once a month and
before any long journey. Check the
tire pressures when the tires are
cold. Use a pre ...
In case of an emergency
Road warning In case of an emergency while driving Overheating Emergency starting
Electrical circuit protection Towing If you have a flat tire ...
