 Suzuki Grand Vitara: Lighting/Turn Signal Control Lever
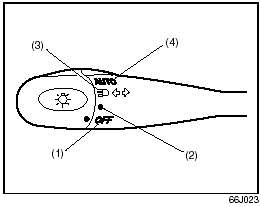
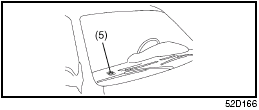
Your vehicleŌĆÖs lighting system is controlled by three main systems: the Lighting switch, the Auto-On Headlight System (when the lighting switch is in the ŌĆ£AUTOŌĆØ position) and the Daytime Running Light (D.R.L.) system. The three systems work together to operate your lights as shown in the following chart:
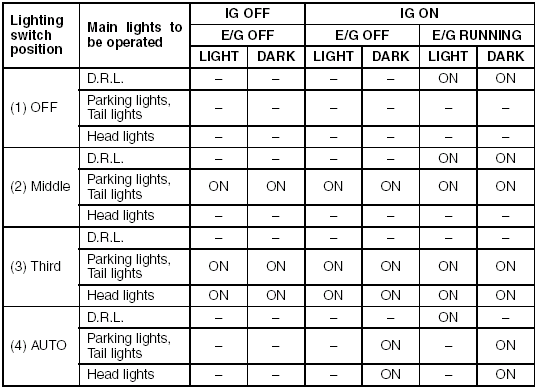
E/G: Engine IG: Ignition switch ON: Lights ON LIGHT: When it is light around the light sensor (5). DARK: When it is dark around the light sensor (5).
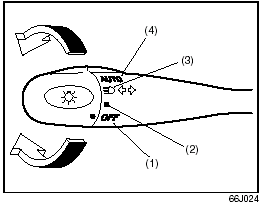
Lighting Operation
This control lever is located on the outboard side of the steering column. Operate the lever as described below. To turn the lights on or off, twist the knob on the end of the lever. There are four positions: in the ŌĆ£OFFŌĆØ (1) position all lights are off; in the second (2) position the front parking lights, tail-lights, license plate light and instrument lights are on, but the headlights are off; in the third (3) position the headlights come on in addition to the other lights; in the ŌĆ£AUTOŌĆØ (4) position, refer to ŌĆ£Auto-On Headlight SystemŌĆØ for details.
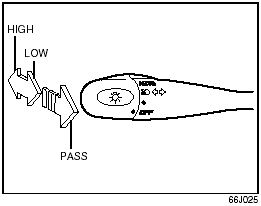
With the headlights on, push the lever forward to switch to the high beams or pull the lever toward you to switch to the low beams. When the high beams are on, a light on the instrument panel will come on. To momentarily activate the high beams as a passing signal, pull the lever slightly toward you and release it when you have completed the signal.
Auto-On Headlight
System
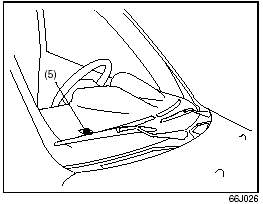
The Auto-on headlight system automatically turns on all lights that are operated by the lighting control lever on the steering column, when the following four conditions are all met. Conditions for Auto-on headlight system operation: 1) It is dark around the light sensor (5). 2) The lighting control lever in the ŌĆ£AUTOŌĆØ position. 3) The ignition switch is in the ŌĆ£ONŌĆØ position. 4) The parking brake is released. This system is operated by the signal from the light sensor (5) on the right end of the instrument panel. Do not cover the sensor (5). If you do, the system will not work correctly.
 WARNING: It takes about 5 seconds
for the light sensor to react to a change in lighting conditions. To help avoid
an accident due to reduced visibility, turn on your headlights before driving into
a tunnel, parking structure or the like.
NOTE: This system does not react to all types of ambient light. As the sensor is infrared type, it will not work correctly with ambient lights that do not contain infrared rays.
Daytime Running Light (D.R.L.) System
The headlights light, but are dimmer than the low beam, when the following three conditions are all met. Also, the D.R.L. indicator light on the instrument panel comes on. Conditions for D.R.L. system operation: 1) The engine is running. 2) The parking brake is released. 3) The lighting switch is in either the ŌĆ£OFFŌĆØ or the ŌĆ£SecondŌĆØ position: or The lighting switch is in the ŌĆ£AUTOŌĆØ position and it is light around the light sensor.
NOTE: Be sure to turn the lighting switch to the third position at night or at any time of the day when driving or weather conditions require the headlights to operate at full brightness and the taillights to be on.
Lights ŌĆ£OnŌĆØ reminder
A buzzer sounds to remind you to turn off the lights if they are left on when the ignition key is removed and the driverŌĆÖs door is opened.
Turn Signal Operation
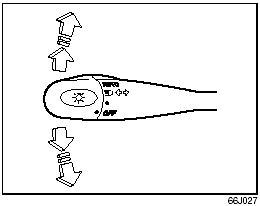
With the ignition switch in the ŌĆ£ONŌĆØ position, move the lever up or down to activate the right or left turn signals.
Normal turn signal
Move the lever all the way up to signal a right turn or all the way down to signal a left turn. When the turn is completed, the signal will cancel and the lever will return to its normal position.
Lane change signal
In some turns, such as changing lanes, the steering wheel is not turned far enough to cancel the turn signal. For convenience, you can flash the turn signal by moving the lever part way and holding it there. The lever will return to its normal position when you release it.
 Ignition Switch
Vehicle Without
Keyless Start System
The ignition switch has the following four positions:
LOCK
This is the normal parking position. It is the only position in which the key
can be removed. It ...
 Windshield Wiper and Washer Lever
Windshield Wipers
To turn the windshield wipers on, move the lever up and down to one of the four
operating positions. In the ŌĆ£INTŌĆØ position (if equipped), the wipers operate intermittently.
...
See also:
Side marker lights
NOTE
Before starting to replace a bulb, see
page 322.
1. Remove the headlight housing from the
vehicle (see page 322).
2. Remove the bulb holder by turning it counterclockwise
and pulling i ...
Initialization
Select ŌĆ£InitializeŌĆØ using .
● Initializing the sound settings
Select ŌĆ£Sound settingŌĆØ using and
press (YES).
For details about sound settings
● Initializing the device inf ...
Maintenance Schedule
The following table shows the times when you should perform regular maintenance
on your vehicle. This table shows in miles, kilometers and months when you should
perform inspections, adjustments, ...
