 Suzuki Grand Vitara: Jump Starting Instructions
 WARNING:
• Never attempt to jump start your vehicle if the battery appears to be frozen.
Batteries in this condition may explode or rupture if jump starting is attempted.
• When making jumper cable connections, be certain that your hands and the jumper
cables remain clear from pulleys, belts or fans.
• Batteries produce flammable hydrogen gas. Keep flames and sparks away from the
battery or an explosion may occur. Never smoke when working near the battery.
• If the booster battery you use for jump starting is installed in another vehicle,
make sure the two vehicles are not touching each other.
• If your battery discharges repeatedly, for no apparent reason, have your vehicle
inspected by an authorized SUZUKI dealer.
• To avoid harm to yourself or damage to your vehicle or battery, follow the jump
starting instructions below precisely and in order. If you are in doubt, call for
qualified road service.
CAUTION: Your vehicle should not be started by pushing or towing. This starting method could result in permanent damage to the catalytic converter. Use jumper cables to start a vehicle with a weak or run-down battery.
When jump starting your vehicle, use the following procedure:

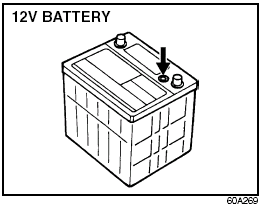
1) Use only a 12 volt battery to jump start your vehicle. Position the good 12V battery close to your vehicle so that the jumper cables will reach both batteries. When using a battery installed on another vehicle, DO NOT LET THE VEHICLES TOUCH. Set the parking brakes fully on both vehicles. 2) Turn off all vehicle accessories, except those necessary for safety reasons (for example, headlights or hazard lights).


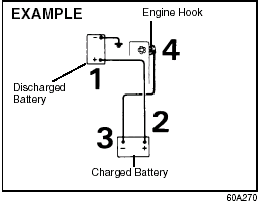
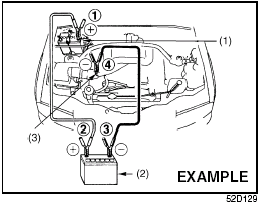
3) Make jumper cable connections as follows: 1. Connect one end of the first jumper cable to the positive (+) terminal of the discharged battery (1). 2. Connect the other end to the positive (+) terminal of the booster battery (2). 3. Connect one end of the second jumper cable to the negative (–) terminal of the booster battery (2). 4. Make the final connection to an unpainted, heavy metal part (i.e. engine hook (3)) of the engine of the vehicle with the discharged battery (1).
 WARNING: Never connect the jumper
cable directly to the negative (–) terminal of the discharged battery, or an explosion
may occur.
4) If the booster battery you are using is installed on another vehicle, start the engine of the vehicle with the booster battery. Run the engine at moderate speed. 5) Start the engine of the vehicle with the discharged battery. 6) Remove the jumper cables in the exact reverse order in which you connected them.
 Jacking Instructions
Jacking Instructions
1) Place the vehicle on level, hard ground. 2) Set the parking brake firmly and
shift into “P” (Park) if your vehicle has an automatic transmission, or shift into
“R ...
 Towing a Disabled Vehicle
Emergency Towing
If your vehicle is disabled, it may be towed by a tow truck using one of the
following methods: 1) Tow the vehicle with two wheels lifted by the tow truck and
the other two wheel ...
See also:
Rear Window Defroster and Outside Rearview Mirrors Defroster (if equipped) Switch
Rear Window Defroster
and Outside Rearview Mirrors Defroster (if equipped) Switch
When the rear window is fogged, push this switch to clear the window.
If the outside rearview mirror has the ma ...
How to insert a CD (type A, C and D)
Hold a disc with a finger in the center hole
while gripping the edge of the disc, then
insert it in to the slot (with the label side
up) and the player will automatically pull
the disc into po ...
Reclining the seatback
Reclining the seatback
Pull the reclining lever up and adjust the
seatback to the desired position. Then
release the lever and make sure the
seatback is securely locked into place.
The seatb ...
