 Dodge Nitro: Jacking and tire changing
WARNING:
• Getting under a jacked-up vehicle is dangerous.
The vehicle could slip off the jack and fall on you.
You could be crushed. Never get any part of your
body under a vehicle that is on a jack. If you need
to get under a raised vehicle, take it to a service
center where it can be raised on a lift.
• The jack is designed to use as a tool for changing
tires only. The jack should not be used to lift the
vehicle for service purposes. The vehicle should
be jacked on a firm level surface only. Avoid ice or
slippery areas.
Jack Location
The scissor-type jack and tire changing tools are located in the left rear trim panel behind the second row seat.
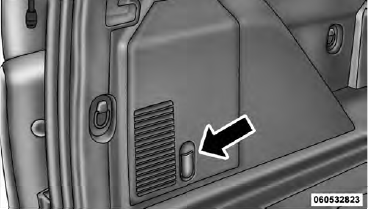 Jack Storage Location
Spare Tire Stowage
The spare tire is stowed underneath the rear of the vehicle and is held in place by a cable winch mechanism.
Spare Tire Removal
Fit the jack handle extension over the drive nut. Use the lug wrench to rotate the nut counterclockwise until the spare is on the ground with enough slack in the cable to allow you to pull the tire out from under the vehicle.
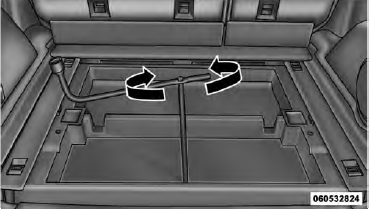 Lowering/Raising Spare Tire
CAUTION: The winch mechanism is designed for use with the jack extension tube only. Use of an air wrench or other power tools is not recommended and they can damage the winch.
When the spare is clear, tilt the retainer at the end of the cable and pull it through the center of the wheel.
Preparations For Jacking
1. Park the vehicle on a firm, level surface. Avoid icy or slippery areas.
WARNING: Do not attempt to change a tire on the side of the vehicle close to moving traffic. Pull far enough off the road to avoid being hit when operating the jack or changing the wheel.
2. Set the parking brake. 3. Place the shift lever into PARK. 4. Turn the ignition to the LOCK position. 5. Turn on the Hazard Warning flasher.
 6. Block both the front and rear
of the
wheel diagonally opposite of the jacking
position. For example, if changing
the right front tire, block the left rear
wheel.
Jacking Instructions
WARNING:
Carefully follow these tire changing warnings to
help prevent personal injury or damage to your
vehicle:
• Always park on a firm, level surface as far from
the edge of the roadway as possible before raising
the vehicle.
• Block the wheel diagonally opposite the wheel to
be raised.
• Set the parking brake firmly and set an automatic
transmission in PARK; a manual transmission in
REVERSE.
• Never start or run the engine with the vehicle on a
jack.
• Do not let anyone sit in the vehicle when it is on a
jack.
• Do not get under the vehicle when it is on a jack.
• Only use the jack in the positions indicated and
for lifting this vehicle during a tire change.
• If working on or near a roadway, be extremely
careful of motor traffic.
• To assure that spare tires, flat or inflated, are
securely stowed, spares must be stowed with the
valve stem facing the ground.
• Turn on the Hazard Warning flasher.
 Jack Warning Label
1. Remove spare tire. 2. Remove jack and tools from mounting bracket. Assemble the tools by connecting the driver to the extension, and then to the lug wrench. 3. Loosen (but do not remove) the wheel lug nuts by turning them to the left one turn while the wheel is still on the ground. 4. Locate the jack as shown. For the front tires, place it (rearward) of the notch on the body weld seam behind wheel to be changed. For the rear tires, place it under the axle by the wheel to be changed. Position the jack handle on the jack. Do not raise the vehicle until you are sure the jack is fully engaged.
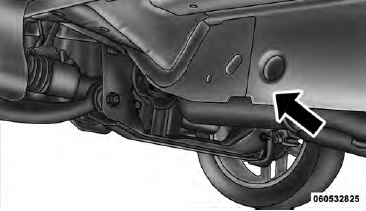 Front Jacking Location
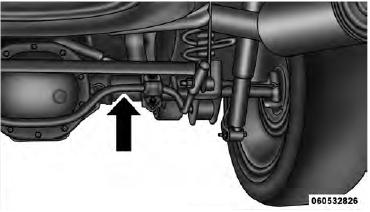 Rear Jacking Location
5. Raise the vehicle by turning the jack screw to the right. Raise the vehicle only until the tire just clears the surface and enough clearance is obtained to install the spare tire. Minimum tire lift provides maximum stability.
WARNING: Raising the vehicle higher than necessary can make the vehicle less stable and cause an accident. It could slip off the jack and hurt someone near it. Raise the vehicle only enough to remove the tire.
6. Remove the lug nuts and wheel. 7. Position the spare wheel/tire on the vehicle and install the lug nuts with the cone-shaped end toward the wheel. Lightly tighten the nuts. To avoid the risk of forcing the vehicle off the jack, do not tighten the nuts fully until the vehicle has been lowered. 8. Lower the vehicle by turning the jack screw to the left, and remove the jack and wheel blocks. 9. Finish tightening the lug nuts. Push down on the wrench while tightening for increased leverage. Alternate nuts until each nut has been tightened twice. The correct wheel nut tightness is 95 ft lbs (130 N·m). If in doubt about the correct tightness, have them checked with a torque wrench by your authorized dealer or at a service station. 10. Lower the jack to its fully closed position.
WARNING: A loose tire or jack thrown forward in a collision or hard stop could endanger the occupants of the vehicle. Always stow the jack parts and the spare tire in the places provided.
11. Secure the tire, jack, and tools in their proper locations.
 If your engine overheats
In any of the following situations, you can reduce the
potential for overheating your engine by taking the
appropriate action.
• On the highways — slow down.
• In city traffic — while ...
 Jump-starting procedures
If your vehicle has a discharged battery it can be jumpstarted
using a set of jumper cables and a battery in
another vehicle or by using a portable battery booster
pack. Jump-starting can be dan ...
See also:
Parking brake
WARNING
Engaging the parking brake while the vehicle is in motion can cause the rear
wheels to lock up. You could lose control of the vehicle and cause an accident.
In addition, the vehicle& ...
How to jump start
1. Make sure the booster battery is 12
volts and the negative terminal is
grounded.
2. If the booster battery is in another
vehicle, do not let the two vehicles touch.
3. Turn off all unnecess ...
Stowing the flat/spare tire
Note: Failure to follow spare tire stowage instructions may result in
failure of cable or loss of spare tire.
If you are stowing a tire that requires reattaching it to the
vehicle with a tether, pe ...
