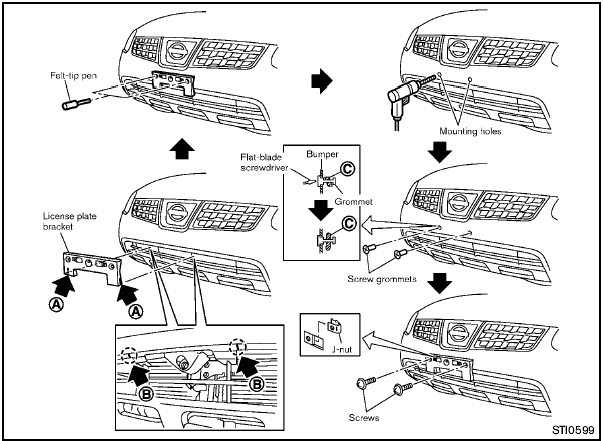
 Nissan Rogue: Installing front license plate

Use the following steps to mount the license
plate:
Before mounting the license plate, confirm that
the following parts are enclosed in the plastic
bag.
- License plate bracket
- J-nut 6 2
- Screw 6 2
- Screw grommet 6 2
1. Temporarily place the license plate bracket by aligning the lower part A of it with the lines B on the bumper.
2. Mark the pilot hole points with a felt-tip pen through the holes of the license plate bracket.
3. Remove the license plate bracket.
4. Carefully drill two pilot holes using a 0.39 in
(10 mm) drill bit at the marked locations. (Be
sure that the drill only goes through the
fascia, or damage to the nut may
occur.)
5. Insert grommets into the hole on the fascia.
6. Insert a flat-blade screwdriver into the grommet hole to add 908 turn onto the part C .
7. Insert a J-nut into the license plate bracket before placing the license plate bracket on the fascia.
8. Install the license plate bracket with screws.
9. Install the license plate with bolts that are no longer than 0.55 in (14 mm).
 Air conditioner specification label
The air conditioner specification label is attached
to the underside of the hood as shown. ...
 Vehicle loading information
- It is extremely dangerous to ride
in a cargo area inside the vehicle.
In a collision, people riding
in these areas are more likely to
be seriously injured or killed.
- Do not allow peopl ...
See also:
Programming A Rolling Code
For programming garage door openers that were manufactured
after 1995. These garage door openers can be
identified by the “LEARN” or “TRAIN” button located
where the hanging antenna is a ...
Supervisor screen controls
Supervisor screen controls
See 104, TOUCH SCREEN OVERVIEW.
1. Select rear media.
2. Current rear media display.
3. Left screen select.
4. Right screen select.
5. Settings screen.
6. Remote co ...
Manual seats
Manual seats
Do not adjust
the seat while the
vehicle is moving. Doing so could
cause loss of vehicle control and
personal injury.
1. Forward and back adjustment.
2. Height adjustment.
3. ...
