 Mitsubishi Outlander: Automatic air conditioning
The air conditioning can only be used while the engine is running.
Control panel
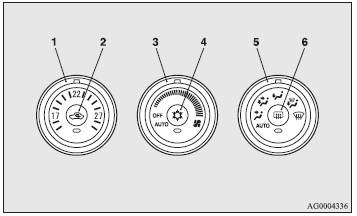
1- Temperature control dial. 2- Air selection switch. 3- Blower speed selection dial. 4- Air conditioning switch. 5- Mode selection dial. 6- Rear window demister switch → P. 3-70.
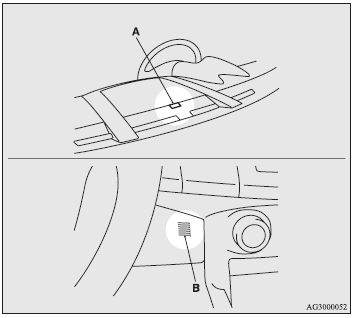
NOTE:
● There is a photo sensor (A) and interior air temperature sensor (B) inside the
vehicle. Do not place anything on these sensors. The sensors will not function properly
if anything is placed on them.
Blower speed selection dial
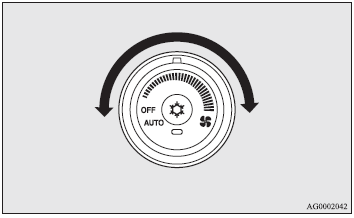
Select the blower speed by turning the blower speed selection dial clockwise or anticlockwise. Turn the dial clockwise to increase the air flow and anticlockwise to decrease the air flow.
Temperature control dial
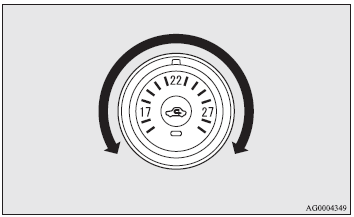
Turn the temperature control dial clockwise or anticlockwise
NOTE:
● While the engine coolant temperature is low, the temperature of the air from the
heater will be cool/cold until the engine warms up even if you have selected warm
air with the dial.
● When the temperature is set to the highest or the lowest setting under the AUTO
operation, the air selection and the air conditioning will be automatically changed
as follows. • Quick Heating (When the temperature is set to the highest setting)
Outside air will be introduced and the air conditioning will stop. • Quick Cooling
(When the temperature is set to the lowest setting) Inside air will be recirculated
and the air conditioning will operate. The settings described above are the factory
settings. The air selection and air conditioning switches can be customised (function
setting changed), and the automatic switching of outside air and the air conditioning
according to operating conditions can be changed as desired. For further information,
we recommend you to consult a MITSUBISHI MOTORS Authorised Service Point. Refer
to “Customising the air conditioning switch (Changing function settings)” on page
5-12. Refer to “Customising the air selection (Changing function settings)” on page
5-10.
Air selection switch
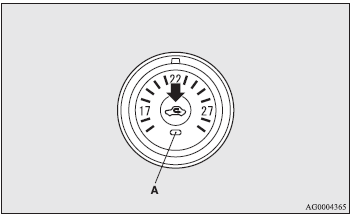
To change the air selection, simply press the air selection switch. There is
a sound each time the switch is pressed.
● Outside air: Indicator lamp (A) is OFF Outside air is introduced into the passenger
compartment.
● Recirculated air: Indicator lamp (A) is ON Air is recirculated inside the passenger
compartment.
CAUTION:
● Normally, use the outside position to keep the windscreen and side windows clear
and quickly remove fog or frost from the windscreen. If high cooling performance
is desired, or if the outside air is dusty or otherwise contaminated use the recirculation
position. Switch to the outside position periodically to increase ventilation so
that the windows do not become fogged up.
● Use of the recirculation position for extended time may cause the windows to fog
up.
NOTE:
● When the mode selection dial or the blower speed selection dial is set to the
“AUTO” position again after manual operation, the air selection dial will also be
automatically controlled.
Customising the air selection (Changing function settings)
Functions can be changed as desired, as stated below.
● Enable automatic air control: If the mode selection dial or blower speed selection
dial is turned to the “AUTO” position, the air selection switch is also controlled
automatically.
● Disable automatic air control: Even if the mode selection dial or blower speed
selection dial is turned to the “AUTO” position, the air selection switch is not
controlled automatically.
● Setting change method Hold down the air selection switch for about 10 seconds
or more. When the setting is changed, a sound is emitted and the indicator lamp
flashes. • When the setting is changed from enable to disable 3 sounds are emitted
and the indicator lamp flashes 3 times. • When the setting is changed from disable
to enable 2 sounds are emitted and the indicator lamp flashes 3 times.
NOTE:
● The factory setting is “Enable automatic air control.”
● When the mode selection dial is turned to ,
in order to prevent misting of the windows the ventilator automatically switches
to outside air even if “Disable automatic air control” is set.
Air conditioning switch
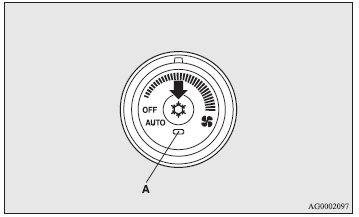
Push the switch to turn the air condition on, indicator lamp (A) will come on. There is a sound each time the switch is pressed.
Push the switch again to switch it off.
CAUTION:
● When using the air conditioning, the idling speed may slightly increase as the
air conditioning compressor is switched on/off automatically. Therefore, use care
when starting to move the vehicle.
NOTE:
● If a problem is detected in the air conditioning system, the air conditioning
operation indicator lamp (A) blinks. Press the air conditioning switch once to turn
it off, then once more to turn it back on. If the air conditioning operation indicator
lamp does not blink for a while, there is nothing wrong. If it starts to blink again,
we recommend you to have it checked.
● Sometimes, for example after using a high-pressure car wash, the condenser can
get wet with water, and the operation indicator lamp (A) blinks temporarily. In
this case there is nothing wrong. Wait for a while, press the air conditioning switch
once to turn the system off, then once more to turn it back on. Once the water evaporates,
the blinking will stop.
Customising the air conditioning switch (Changing function settings)
Functions can be changed as desired, as stated below.
● Enable automatic air conditioning control: If the mode selection dial or blower
speed selection dial is turned to the “AUTO” position, or the temperature control
dial is set to the minimum temperature, the air conditioning switch is controlled
automatically.
● Disable automatic air conditioning control: The air conditioning switch is not
controlled automatically as long as the air conditioning switch is not operated.
● Setting change method Hold down the air conditioning switch for about 10 seconds
or more. When the setting is changed, a sound is emitted and the indicator lamp
flashes. • When the setting is changed from enable to disable 3 sounds are emitted
and the indicator lamp flashes 3 times. • When the setting is changed from disable
to enable 2 sounds are emitted and the indicator lamp flashes 3 times.
NOTE:
● The factory setting is “Enable automatic air conditioning control”.
● When you turn the mode selection dial to ,
in order to prevent misting of the windows the air conditioning operates automatically
even if “Disable automatic air conditioning control” is set.
Operating the system in automatic mode
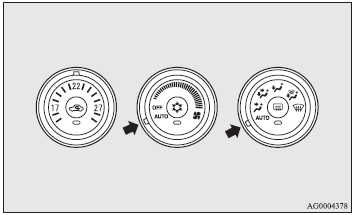
In normal conditions, use the system in the AUTO mode and follow these procedures: 1. Set the blower speed selection dial to the “AUTO” position. 2. Set the temperature control dial to the desired temperature. 3. Set the mode selection dial to the “AUTO” position.
The outlet port (except , recirculation/outside
air select and blower speed, and ON/OFF of air conditioning will be controlled automatically.
To stop the system, turn the blower speed selection dial to the “OFF” position.
CAUTION:
● When using the air conditioning, the idling speed may slightly increase as the
air conditioning compressor is switched on/off automatically. Therefore, use care
when starting to move the vehicle.
NOTE:
● While the engine coolant temperature is low, the temperature of the air from the
heater will be cool/cold until the engine warms up, even if you have selected warm
air with the dial. To prevent the windscreen and windows from fogging up, the ventilator
mode will be changed to and the blower
speed will be reduced.
● If the blower speed selection dial, air conditioning switch, mode selection dial,
or air selection switch is operated while the system is operating in the AUTO mode,
the activated function overrides the corresponding function of automatic control.
All other functions remain under automatic control.
Operating the system in manual air mode
Blower speed and ventilator mode may be controlled manually by setting the blower speed selection dial and the mode selection dial to the desired positions. To return to automatic operation, set the dials to the “AUTO” position.
Demisting of the windscreen and door windows
CAUTION:
● For safety, make sure you have a clear view through all the windows.
Use the mode selection dial ( or
or )
to remove frost or mist from the windscreen or door windows.
For ordinary demisting
Perform the following settings to prevent the misting of the windscreen and door windows, and heat the leg area.
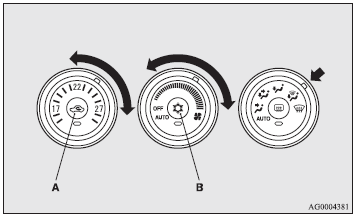
1. Set the air selection switch (A) to the outside position. 2. Set the mode
selection dial to the position. 3.
Select your desired blower speed by turning the blower speed selection dial. 4.
Select your desired temperature by turning the temperature control dial. 5. Push
the air conditioning switch (B).
For quick demisting
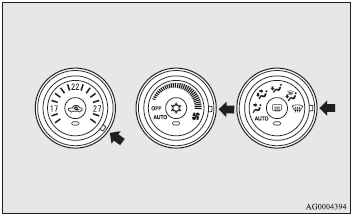
1. Set the mode selection dial to the position.
2. Set your blower to the maximum speed. 3. Set the temperature to the highest position.
NOTE:
● With the mode selection dial in the position,
the air conditioning operates automatically and outside air is set automatically.
● To demist effectively, direct the air flow from the side ventilators toward the
door windows.
● Do not set the temperature control dial to the max. cool position. Cool air will
blow against the window glasses and prevent demisting.
 Ventilators
1- Centre ventilators. 2- Side ventilators.
Air flow and direction adjustments
Centre ventilators
Move the knob (A) to adjust the air flow direction. To close the ventilator,
fully move the kno ...
 Important operation tips for the air conditioning
● Park the vehicle in the shade. Parking in the hot sun will make the vehicle inside
extremely hot, and it will require more to cool the interior. If it is necessary
to park in the sun, op ...
See also:
Hill and Mountain Roads
Driving on steep hills or through mountains is different than driving on flat
or rolling terrain. Tips for driving in these conditions include:
○ Keep the vehicle serviced and in good shape.
...
Head restraints
Head restraints are provided for all seats.
Front seats
1 Up
Pull the head restraints up.
2 Down
Push the head restraint down
while pushing the lock release
button.
Second seats
1 Up
Pul ...
Disarming if the smart key and keyless entry fail to work
The vehicle can still be unlocked and the alarm
disabled. To unlock the vehicle:
1. Unlock the left side front door using the
key blade. The alarm will be triggered.
2. Position the Smart Key agai ...
