 GMC Terrain: When It Is Time for New Tires
Factors such as maintenance, temperatures, driving speeds, vehicle loading, and road conditions affect the wear rate of the tires.

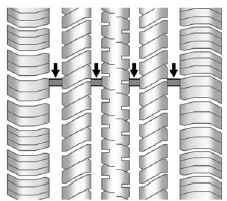
Treadwear indicators are one way to tell when it is time for new tires. Treadwear indicators appear when the tires have only 1.6mm (1/16 in) or less of tread remaining. See Tire Inspection on page 10‑57 and Tire Rotation on page 10‑57 for more information.
The rubber in tires ages over time. This also applies for the spare tire, if the vehicle has one, even if it is never used. Multiple conditions including temperatures, loading conditions, and inflation pressure maintenance affect how fast aging takes place. Tires will typically need to be replaced due to wear before they may need to be replaced due to age. Consult the tire manufacturer for more information on when tires should be replaced.
 Tire Rotation
Tires should be rotated every 12 000 km (7,500 mi). See Maintenance Schedule
on page 11‑3.
Tires are rotated to achieve a uniform wear for all tires. The first rotation
is the most importan ...
 Vehicle Storage
Tires age when stored normally mounted on a parked vehicle. Park a vehicle that
will be stored for at least a month in a cool, dry, clean area away from direct
sunlight to slow aging. This area sh ...
See also:
Guidelines
The RVC system has a guideline overlay that can help the driver align the vehicle
when backing into a parking spot.
To turn the guidelines on or off:
1. Shift into P (Park).
2. Press the CONFIG b ...
Owner’s Manual/Service Manual order information
Genuine NISSAN Service Manuals for this
model year and prior can be purchased. A
genuine NISSAN Service Manual is the best
source of service and repair information for your
vehicle. This manua ...
Search area
When searching the database, only points of
interest in the current search area are included,
except for the sub-categories marked All
search areas in the POI category list. ...
