Range Rover Evoque: Tyre pressure monitoring (TPM) system
 The TPM system provides a low
pressure warning and does not
re-inflate your tyres. Tyre pressures
should be checked regularly using an
accurate pressure gauge when cold.
The TPM system provides a low
pressure warning and does not
re-inflate your tyres. Tyre pressures
should be checked regularly using an
accurate pressure gauge when cold.
The TPM system can NOT register
damage to a tyre. Regularly check the
condition of your tyres, especially if
the vehicle is driven off-road.
 When inflating tyres, take
care not to
bend or damage the TPM system
valves. Always ensure correct
alignment of the inflation head to the
valve system.
When inflating tyres, take
care not to
bend or damage the TPM system
valves. Always ensure correct
alignment of the inflation head to the
valve system.
Note: Different types of tyre may affect the performance of the TPM system. Always replace tyres in accordance with recommendations.
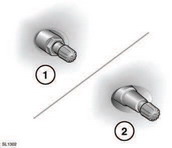
1. TPM system external metal lock nut and valve.
2. Non TPM system rubber valve.
The TPM system constantly monitors the tyre pressure in each wheel. Temporary use spare tyres (when fitted) are not monitored.

The tyre pressure warning lamp illuminates when one or more of the tyres is significantly under-inflated or a non TPM system wheel and tyre is in use.
This will be accompanied by a graphic and message in the message centre. The graphic and message will indicate which of the TPM system tyres needs attention.
You should stop and check the tyres as soon as possible and inflate them to the recommended pressure. See 212, CHECKING THE TYRE PRESSURES.
READ NEXT:
 Tpm system messages
When a problem is detected, the warning lamp
will illuminate or flash. A text message will be
displayed. Until the fault is rectified, the
warnings will be repeated each time the
ignition is switc
Tyre change
Valve stem seal, washer, nut,
valve core
and cap should be replaced at every tyre
change. Valve stem seal, washer and
nut must be replaced if valve retention
nut is loosened. Sensor units and n
Replacement sensor
Should the sensor require replacing, it should
be carried out by a Dealer/Authorised Repairer.
A replacement sensor must be fitted to a
running wheel in order to be recognised by the
system. The v
SEE MORE:
Jacking
General
WARNING: The
following instructions must be adhered to before raising the vehicle off the
ground:
Position vehicle on a solid, level surface.
Apply the parking brake.
Select 'P' - PARK on automatic transmission selector.
Select 'N' - Neutral on manual transmission.
WARNING: If
the
Headlamps
Moving the nearside headlamp unit to access
bulbs;
1. Remove the two plastic fixings.
2. Pull the tube up to release from the air box.
This will allow more room for
manoeuvrability.
3. Remove the four grille fixings.
4. Remove the two retaining bolts.
5. At the rear of the headlamp unit, p
