 Subaru Forester: Towing and tie-down hooks
The towing hooks should be used only in an emergency (e.g., to free a stuck vehicle from mud, sand or snow).

- Use only the specified towing hook and tie-down hook. Never use suspension parts or other parts of the body for towing or tie-down purposes.
- To prevent deformation to the front bumper and the towing hook, do not apply excessive lateral load to the towing hook.
Front towing hook:
1. Take the towing hook out of the tool bucket and take the screwdriver out of the tool bag. Take the wheel nut wrench out of the cargo area.
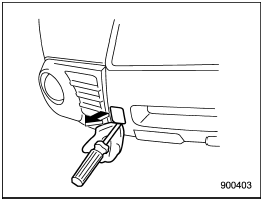
2. Pry off the cover on the front bumper using a screwdriver, and you will find a threaded hole for attaching the towing hook.
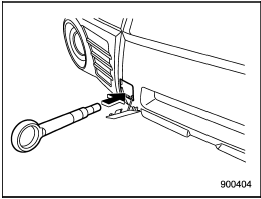
3. Screw the towing hook into the thread hole until its thread can no longer be seen.
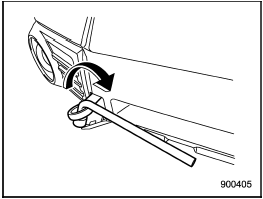
4. Tighten the towing hook securely using a wheel nut wrench.
After towing, remove the towing hook from the vehicle and stow it in the tool bucket.
Fit the towing hook cover on the bumper.

- Do not use the towing hook except when towing your vehicle.
- Be sure to remove the towing hook after towing. Leaving the towing hook mounted on the vehicle could interfere with proper operation of the SRS airbag system in a frontal collision.
Rear towing hook:

If a trailer hitch is installed, it is not possible to install the rear towing hook.
To install the rear towing hook, the standard bumper beam must be installed on the vehicle at a SUBARU dealer. Consult a SUBARU dealer for details.
Use a hitch ball and follow the instructions below when towing.
- The weight of the object being towed must be less than the weight of the vehicle.
- Drive the vehicle 20 mph (32 km/h) or less speed.
- Do not drive more than 31 miles (50 km).
1. Take the towing hook out of the tool bucket and take the screwdriver out of the tool bag. Take the wheel nut wrench out of the cargo area.
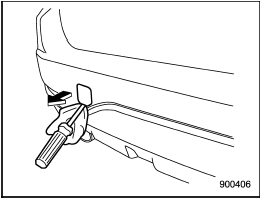
2. Pry off the cover on the rear bumper using a screwdriver, and you will find a threaded hole for attaching the towing hook.
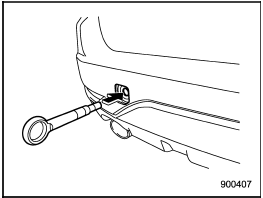
3. Screw the towing hook into the thread hole until its thread can no longer be seen.
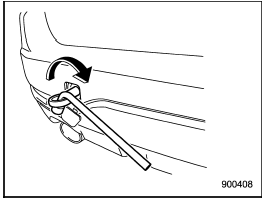
4. Tighten the towing hook securely using a wheel nut wrench.
After towing, remove the towing hook from the vehicle and stow it in the tool bucket.
Fit the towing hook cover on the bumper.

Do not use the towing hook except when towing your vehicle.
Front tie-down hooks:
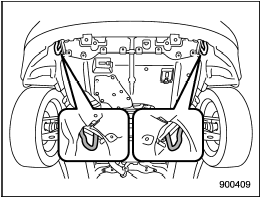
The front tie-down hooks are located between each of the front tires and the front bumper.
Rear tie-down hooks:
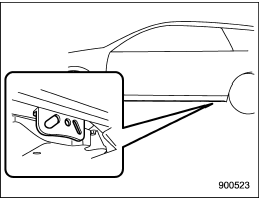
The rear tie-down hooks are located near each of the jack-up reinforcements.

Use the rear tie-down hooks only for downward anchoring. If they are used to anchor the vehicle in any other direction, cables may slip off the hooks, possibly causing a dangerous situation.
 Towing
If towing is necessary, it is best done by
your SUBARU dealer or a commercial
towing service. Observe the following
procedures for safety.
Never tow AWD models (both AT and
MT) with t ...
 Using a flat-bed truck
This is the best way to transport your
vehicle. Use the following procedures to
ensure safe transportation.
1. Shift the select lever into the “P”
position for automatic transmission mode ...
See also:
Brake fluid
■ Checking fluid level
The brake fluid level should be
between the “MAX” and “MIN”
lines on the tank.
Make sure to check the fluid type and prepare the necessary items.
■ Ad ...
Front Seat Heater (if equipped)
Front Seat Heater
(if equipped)
With the ignition switch in the “ON” position, push in one or both of the seat
heater switches to warm the corresponding seat(s). The indicator light below th ...
Adjusting the front seat shoulder belt anchor height
Adjusting the front seat shoulder belt anchor height
The shoulder belt anchor height should be
adjusted to the position best suited for the
driver/front passenger. Always adjust the
anchor he ...
