Range Rover Evoque: Tether anchorage points (Australia only)
 WARNING:
Child restraint anchorages
are designed to withstand only those
loads imposed by correctly fitted child
restraints. Under no circumstances
are they to be used for adult seat
belts, harnesses or for attaching other
items or equipment to the vehicle.
WARNING:
Child restraint anchorages
are designed to withstand only those
loads imposed by correctly fitted child
restraints. Under no circumstances
are they to be used for adult seat
belts, harnesses or for attaching other
items or equipment to the vehicle.
Always follow the child seat or
restraint system manufacturer’s
instructions when fitting tether straps.
When fitting a child seat or restraint
system, always pass the tether strap
over the top of the seat back and
beneath the head restraint.
If a child seat or restraint system is to
be fitted to the centre seating
position, the centre armrest must be
in the stowed position (folded into the
seat).
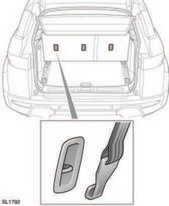
Your vehicle is equipped with anchorage points on the back of the second row seat frames.
These should be used to attach straps from child seats or restraint systems.
Note: A tether anchorage is provided for the centre seat position. Do not use this anchor position with an ISOFIX child seat.
READ NEXT:
 Attaching tether straps
1. Install the child restraint securely in one of
the rear seating positions.
2. Pass the tether strap over the seat back and
beneath the head restraint.
3. Attach the tether strap hook to the tet
Airbag supplementary restraint system (SRS)
Airbag supplementary restraint system (SRS)
1. Front passenger’s airbag
2. Curtain airbags
3. Side airbags
4. Knee-bolster airbag
5. Driver’s airbag
Note: The general location of airbags f
Airbag operation
For the airbags to operate
correctly
the roof lining and door post trims
must be in good condition, correctly
fitted, and free from obstruction. Any
damage, wear, or incorrect fitment
should b
SEE MORE:
Rear Wheel Bearing
Special Tool(s)
204-250
Wheel bearing install and removal tool
204-305
Remover, Wheel Bearing
204-726
Remover/Installer, Wheel Bearing
JLR-204-806
Support Tool, Wheel Knuckle
JLR-204-809
Installer, Rear Wheel Bearing
JLR-204-810
Installer, Rear Wheel Bearing
General Equipment
Copper Hammer
Hydrau
Engine Oil Draining and Filling, Camshafts
Engine Oil Draining and Filling
Draining
NOTE: Removal steps in this procedure may contain installation details.
1. WARNING: Make sure to support the vehicle with axle stands.
Raise and support the vehicle.
2. Remove the engine undershield.
Refer to: Engine Undershield (501-02 Front End Body Panels
