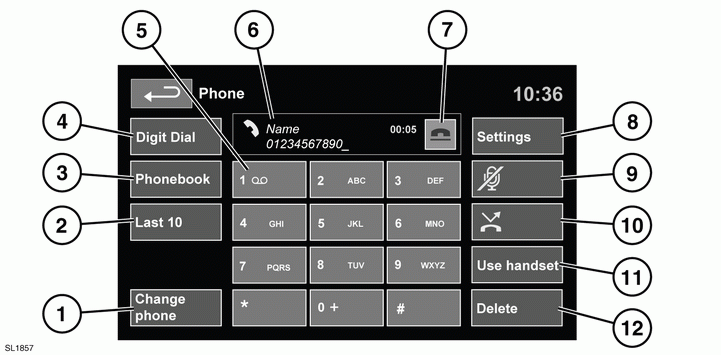
Range Rover Evoque: Telephone system controls

Telephone system controls
1. Change phone. Touch to search new or
change to another paired phone.
2. Last 10. Select to access the last 10 dialled,
received and missed calls.
3. Phonebook. Select to access the
downloaded phonebook.
4. Digit Dial. Select to access Digit Dial
mode.
5. Touch and hold soft key 1 to retrieve your
Voice mail.
6. Status display. Displays the name and/or
number dialled and call duration.
7. Call Connect/Disconnect icons. Touch to
send/accept or end/reject a call.
8. Settings. Select to access; Voice mail,
Answer options and Phone options.
9. Mute microphone. Select to initiate
Privacy mode. While selected, the caller
will not hear you talking.
10. Touch to activate/deactivate Auto reject.
When active, any incoming calls will be
rejected or diverted to voice mail
(depending on mobile phone settings).
11. Use handset. Select to switch the call to
your mobile phone.
12. Delete. Touch and release to delete the last
entered digit. Touch and hold to delete the
whole entered number.
READ NEXT:
Note: The process of pairing and connecting
your phone with the vehicle using the mobile
phone, will vary depending on the type of
mobile phone used.
1. Switch the ignition on and ensure that the
1. Switch on your mobile phone’s Bluetooth®
connection. Make sure that your mobile
phone is in Bluetooth® discoverable mode,
sometimes referred to as find me mode
(see your phone’s operating
Up to 10 mobile phones can be paired with the
vehicle in the same way. However, only one can
be connected and ready for use as a phone at
any one time.
To connect a different paired phone, follow
SEE MORE:
Removal
NOTES:
The rear side member lower side extension is manufactured from DP600 with
a mild steel mounting bracket.
The panel is serviced less its weld studs.
1. The rear side
member closing
panel is replaced
2. For additional information relating to this repair procedure please see
the foll
Control Diagram
NOTE: A = Hardwired; N = Medium speed CAN (controller area network) bus; O
= LIN (local interconnect network)
bus
CONTROL DIAGRAM - FRONT POWER OPERATED NON-MEMORY SEATS
Driver seat forward-rearward motor
Driver seat recline motor
Driver seat height motor
Driver lumbar pump
D
© 2011-2024 Copyright www.rrevoque.org


