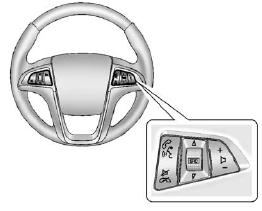
 GMC Terrain: Steering Wheel Controls

For vehicles with audio steering wheel controls, some audio controls can be adjusted at the steering wheel.
 (Push to Talk): For vehicles with
BluetoothÂŽ or OnStarÂŽ, press to interact with those systems. See Bluetooth (Overview)
on page 7‑34 or Bluetooth (Infotainment Controls) on page 7‑36 or Bluetooth (Voice
Recognition) on page 7‑39 or OnStar Overview on page 14‑1 for more information.
 (Mute/End Call): Press to reject
an incoming call, or end a current call. Press to silence the vehicle speakers while
using the infotainment system. Press again to turn the sound on.
 (Toggle Switch): Press to select
an audio source.
Toggle up or down to select the next or previous favorite radio station or CD/MP3 track.
 (Volume): Press + or − to increase
or decrease the volume.
 Steering Wheel Adjustment
To adjust the steering wheel:
1. Pull the lever (A) down.
2. Move the steering wheel up or down.
3. Pull or push the steering wheel closer or away from you.
4. Pull the lever (A) up to lock the ...
 Horn
Horn
Pressa on the steering wheel pad
to sound the horn. ...
See also:
Octane rating tips
Using unleaded gasoline with an octane
rating lower than recommended can cause
persistent, heavy âspark knockâ. (Spark
knock is a metallic rapping noise.) If
severe, this can lead to engin ...
Unlocking the doors with the detached key blade
Insert the key blade as far as possible in the
driver's door lock. Turn the key blade clockwise
approximately one-quarter turn to unlock
the driver's door only.
NOTE
After unlocking the driver ...
Measuring and adjusting air pressure to achieve proper inflation
Check and, if necessary, adjust the
pressure of each tire (including the
spare) at least once a month and
before any long journey. Check the
tire pressures when the tires are
cold. Use a pre ...
