Honda CR-V: Resetting the Engine Oil Life Display
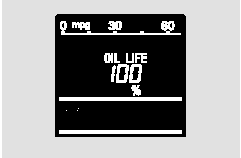
Your dealer will reset the display after completing the required maintenance service. You will see ‘‘OIL LIFE 100%’’ on the information display the next time you turn the ignition switch to the ON (II) position.
If maintenance service is done by someone other than your dealer, reset the maintenance minder as follows:
1. Turn the ignition switch to the ON (II) position.
2. Press the select/reset knob repeatedly until the engine oil life is displayed.
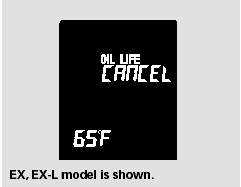
3. Press the select/reset knob for about 10 seconds. The information display shows the resetmode initial display as shown.
4. Select the ‘‘OIL LIFE’’ indicator by turning the select/reset knob. The display begins to blink. Push the same knob to enter this setting.
5. The engine oil life and the maintenance item code(s) will begin to blink. Press the select/ reset knob for another 5 seconds.
6. The maintenance item code(s) will disappear, and the engine oil life will reset to ‘‘100.’’
READ NEXT:
 Important Maintenance Precautions
If you have the required service
done but do not reset the display, or
reset the display without doing the
service, the system will not show the
correct maintenance intervals. This
can lead
Owner’s Maintenance Checks
You should check the following
items at the specified intervals. If
you are unsure of how to perform
any check, turn to the appropriate
page listed.
Engine oil level - Check every
time you
Fluid Locations
Fluid Locations
SEE MORE:
Cylinder Head Installation
1. Install a new coolant separator in the engine block
whenever the engine block is replaced.
2. Clean the cylinder head and block surface.
3. Install the new cylinder head gasket (A) and dowel
pins (B) on the engine block. Always use a new
cylinder head gasket.
Set the crankshaft to top dead cen
Radiator Cap Test
1. Remove the radiator cap (A), wet the seal with
engine coolant, then install it on the pressure tester
(B) (commercially available).
2. Apply a pressure of 93-123 kPa
(0.95-1.25 kgf/cm2, 14-18 psi).
3. Check for a drop in pressure.
4. If the pressure drops, replace the cap.
Radiator Test
1. W
