Honda CR-V: Replacing a Front Turn Signal Light Bulb
Honda CR-V (2006–2011) Owner's Manual / Maintenance / Lights / Replacing a Front Turn Signal Light Bulb

1. Open the hood.
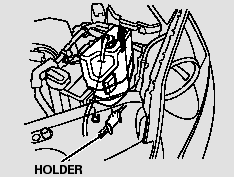
To change the turn signal bulb on the driver’s side, remove the engine coolant reserve tank by pulling it out of its holder.

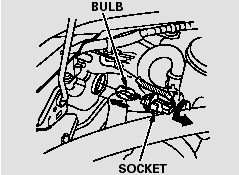
2. Remove the socket from the headlight assembly by turning it one-quarter turn counterclockwise.
3. Pull the bulb straight out of its socket. Push the new bulb straight into the socket until it bottoms.
4. Insert the socket back into the headlight assembly. Turn it clockwise to lock it in place.
5. Turn on the lights to make sure the new bulb is working.
6. (Driver’s side)
Reinstall the coolant reserve tank.
READ NEXT:
 Replacing a Parking Light/Front Side Marker Light Bulb
1. Open the hood.
To change the parking light/front
side marker on the driver’s side,
remove the fuse box fromits stay
by pulling out.
2. Remove the socket from the
headlight assembly
 Replacing Rear Bulbs
1. Open the tailgate. Place a cloth on
the edge of the cover to prevent
scratches. Remove the covers by
carefully prying on the edge with a
small flat-tip screwdriver.
2. Use a Phillips-h
 Replacing a High-mount Brake Light Bulb
1. Open the tailgate.
Unlatch the top of the cover by
pulling back on it with your hands.
2. Place a cloth on the side edge of
the cover to prevent scratches.
Remove the cover by carefully
SEE MORE:
 Ignition Switch
The ignition switch has four
positions: LOCK (0), ACCESSORY
(I), ON (II), and START (III).
LOCK (0) - You can insert or
remove the key only in this position.
To turn the key, the shift lever must
be in Park, and you must push the
key in slightly.
If the front wheels are turned, the
 Valve, Spring, and Valve Seal Installation
Special Tools Required
Stem seal driver 07PAD-001 0000
Valve spring compressor attachment 07757-PJ1010A
1. Coat the valve stems with engine oil. Install the
valves in the valve guides.
2. Check that the valves move up and down smoothly.
3. Install the spring seats on the cylinder head.
4. Ins
© 2016-2024 Copyright www.hcrv.net

