Mercedes-Benz GLK-Class: Stowage areas
Stowage compartments
Important safety notes
WARNING
To help avoid personal injury during a collision or sudden maneuver, exercise care when storing objects in the vehicle. Put luggage or cargo in the cargo compartment if possible. Do not pile luggage or cargo higher than the seat backrests.
Keep compartment lids closed. This will help to prevent stored objects from being thrown about and injuring vehicle occupants during
- braking
- vehicle maneuvers
- an accident
Stowage compartments in the front
Glove box
![]() Depending on the vehicle's equipment, you will find an AUX IN jack or a Media
Interface installed in the glove box. A Media Interface is a universal interface
for mobile audio equipment, e.g. for an iPod® or USB device (see the separate COMAND
operating instructions).
Depending on the vehicle's equipment, you will find an AUX IN jack or a Media
Interface installed in the glove box. A Media Interface is a universal interface
for mobile audio equipment, e.g. for an iPod® or USB device (see the separate COMAND
operating instructions).
![]() The glove box can be ventilated ().
The glove box can be ventilated ().
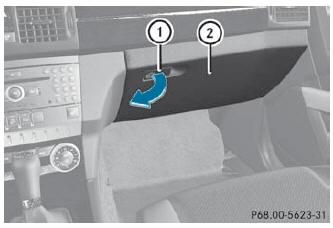
- To open: pull handle 1 and open glove box flap 2.
- To close: fold glove box flap 2 upwards until it engages.
The glove box can only be locked and unlocked using the mechanical key.
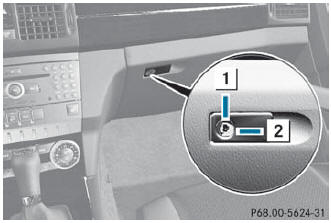
- To lock: insert the mechanical key into the lock and turn it 90° clockwise to position 2.
- To unlock: insert the mechanical key into the lock and turn it 90° counter-clockwise to position 1.
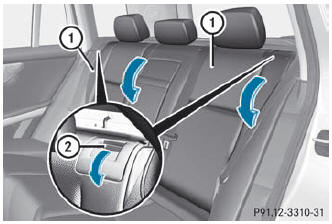
Stowage compartment under the armrest
![]() A small and a large stowage compartment are located under the armrest. The
small stowage compartment can be removed for emptying.
A small and a large stowage compartment are located under the armrest. The
small stowage compartment can be removed for emptying.
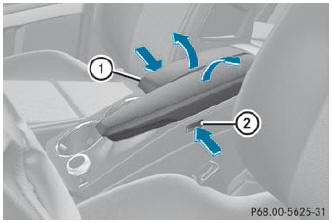
- To open: press left-hand button 2 or righthand button 1. The stowage compartment opens.
Stowage compartments in the rear
Stowage compartment in the rear
![]() Do not sit or lean your bodyweight on the armrests when they are folded out
as you could damage them.
Do not sit or lean your bodyweight on the armrests when they are folded out
as you could damage them.
![]() Close the cover of the stowage compartment before folding the rear seat armrest
back into the seat backrest.
Close the cover of the stowage compartment before folding the rear seat armrest
back into the seat backrest.
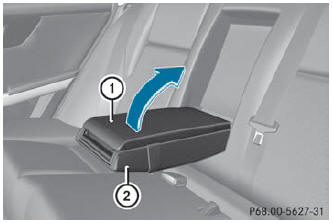
- To open: fold down seat armrest 2.
- Fold cover 1 of the armrest upwards.
Stowage pockets
![]() WARNING
WARNING
Storage bags are intended for storing lightweight items only.
Heavy objects, objects with sharp edges or fragile objects may not be transported in the storage bag. In an accident, during hard braking, or sudden maneuvers, they could be thrown around inside the vehicle and cause injury to vehicle occupants. Storage bags cannot protect transported goods in the event of an accident.
Storage bags are located in the rear compartment on the driver's and frontpassenger seat backrests.
Parcel nets
![]() WARNING
WARNING
Parcel nets are intended for storing lightweight items only, such as road maps, mail, etc.
Heavy objects, objects with sharp edges, or fragile objects may not be transported in the parcel nets. In an accident, during hard braking, or sudden maneuvers, they could be thrown around inside the vehicle and cause injury to vehicle occupants.
Parcel nets cannot protect transported goods in the event of an accident.
Parcel nets are located in the front-passenger footwell and on the left-hand side of the cargo compartment.
Cargo compartment enlargement
Important safety notes
![]() WARNING
WARNING
Always lock the seat backrest in its upright position when the rear seat bench is occupied, or the extended cargo volume is not in use.
Check for secure locking by pushing and pulling on the seat backrest. In an accident, during hard braking or sudden maneuvers, loose items will be thrown around inside the vehicle. This can cause injury to vehicle occupants unless the items are securely fastened in the vehicle. To help avoid personal injury during a collision or sudden maneuver, exercise care when transporting cargo.
![]() WARNING
WARNING
Never drive a vehicle with the tailgate open. Deadly carbon monoxide (CO) gases may enter vehicle interior resulting in unconsciousness and death.
The left-hand and right-hand rear seat backrests can be folded forwards separately to increase the cargo compartment capacity.
Folding the rear seat backrest forward
- Fully insert the backrest head restraints ().
- Move the driver's or front-passenger seat forward if necessary.
- Pull left-hand or right-hand release handle 2 of the seat backrest forwards. Corresponding seat backrest 1 is released.
- Fold seat backrest 1 forwards.
- Move the driver's or front-passenger seat back if necessary.
Folding the rear seat backrest back
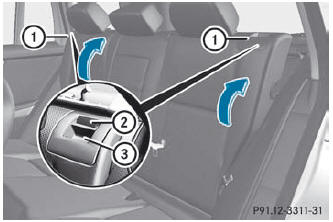
- : Backrest
- ; Lock verification indicator
- = Backrest release handle
- Move the driver's or front-passenger seat forward if necessary.
![]() Make sure that the seat belt does not become trapped when folding the rear
seat backrest back. Otherwise, it could be damaged.
Make sure that the seat belt does not become trapped when folding the rear
seat backrest back. Otherwise, it could be damaged.
- Fold seat backrest 1 back until it engages. Red lock status indicator 2 is no longer visible.
![]() WARNING
WARNING
If a red indicator is visible with the seat backrest up, then the seat backrest is not properly locked into position.
Always lock seat backrest in its upright position when rear seat bench is occupied, or the expanded cargo volume is not in use. Check for secure locking by pushing and pulling on the seat backrest.
In an accident, during hard braking or sudden maneuvers, loose items will be thrown around inside the vehicle. This can cause injury to vehicle occupants unless the items are securely fastened in the vehicle.
To help avoid personal injury during a collision or sudden maneuver, exercise care when transporting cargo.
- Adjust the head restraints if necessary ().
- Move the driver's or front-passenger seat back if necessary.
Securing cargo
Cargo tie-down rings
Observe the following notes on securing loads:
- secure the load using the cargo tie down rings.
- do not use elastic straps or nets to secure a load, as these are only intended as an anti-slip protection for light loads.
- do not route tie downs across sharp edges or corners.
- pad sharp edges for protection.
There are four cargo tie down rings in the cargo compartment and two in the rearcompartment footwells.
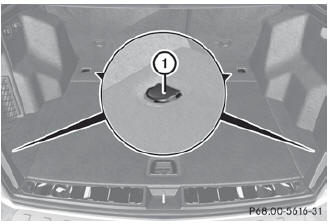
1 Cargo tie down rings in the cargo compartment
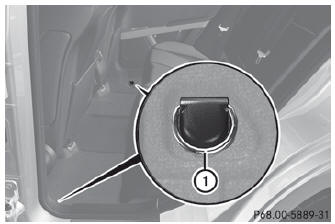
1 Cargo tie down rings in the rearcompartment footwell (Canada only)
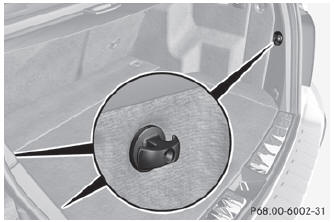
Bag hooks
![]() The bag hook can bear a maximum load of 11 lbs (5 kg). Do not use it to secure
a load.
The bag hook can bear a maximum load of 11 lbs (5 kg). Do not use it to secure
a load.
There is one bag hook on the left side wall in the cargo compartment and there are two hooks on the right and left of the lower D-pillar trim.
Cargo compartment cover
Important safety notes
![]() When loading the vehicle, make sure that you do not stack the load in the cargo
compartment higher than the lower edge of the side windows. Do not place heavy objects
on top of the cargo compartment cover.
When loading the vehicle, make sure that you do not stack the load in the cargo
compartment higher than the lower edge of the side windows. Do not place heavy objects
on top of the cargo compartment cover.
The cargo compartment cover is located behind the rear bench seat backrest.
![]() You can fold up the solid section of the cargo compartment cover approximately
45˚ to facilitate loading the cargo compartment.
You can fold up the solid section of the cargo compartment cover approximately
45˚ to facilitate loading the cargo compartment.
Extending and retracting the cargo compartment cover
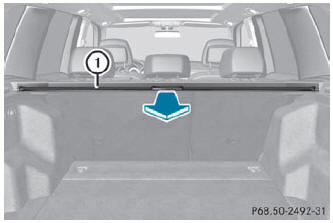
- To extend: pull cargo compartment cover 1 back and clip it into the retainers on the left and right.
- To retract: unhook cargo compartment cover 1 from the retainers on the left and right and guide it forwards by the grab handle until it is fully retracted.
Installing/removing the cargo compartment cover
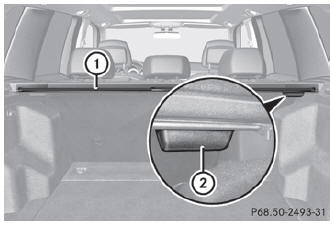
- To remove: make sure that cargo compartment cover 1 is rolled up.
- Press handle 2 on the right underside to the left.
- Remove cargo compartment cover 1.
- To install: attach cargo compartment cover 1 to the opening on the left-hand side.
- Press handle 2 to the right.
- Allow cargo compartment cover 1 to engage in the appropriate recess.
Cargo net
Important safety notes
![]() WARNING
WARNING
Make sure the cargo net is properly engaged at top and bottom position and the tightening belts are securely fastened.
Never use a damaged cargo net. Always use cargo net when transporting cargo. This helps to avoid personal injury from smaller objects being thrown around in the occupant compartment during a collision or sudden maneuver.
The cargo net cannot prevent the movement of large, heavier objects into the passenger compartment in an accident. Such items must be properly secured using the cargo tie-down rings in the cargo compartment floor.
Passenger use of seats behind installed cargo net is restricted because of the footwell being taken up by the net.
It is particularly important to use a safety net if the vehicle is loaded with small objects above the level of the backrests. For safety reasons, always use a cargo net when transporting loads.
Preparing the cargo net
The cargo net can be used in two different positions (behind the B-pillar or the C-pillar).
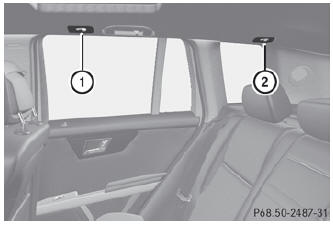
- The brackets behind B-pillar : are required for the cargo compartment enlargement (). The corresponding cargo tie down rings to tighten the net are located in the footwell of the rear bench seat ().
- The brackets behind C-pillar ; are required for the cargo compartment behind the rear bench seat.
The corresponding cargo tie down rings to tension the net are located in the cargo compartment ().
The cargo net is located in the loading tray in the stowage well under the trunk floor ().
- Open both Velcro fasteners and remove the cargo net.
- Unroll and unfold the cargo net. The upper and lower guide rods must engage audibly.
Attaching the cargo net
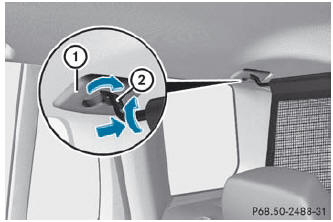
Cargo net attached behind the C-pillar
- Insert guide rod 2 into retainer 1 in the direction of the arrow.
- Slide guide rod 2 forwards into retainer 1 in the direction of the arrow.
Tightening the cargo net
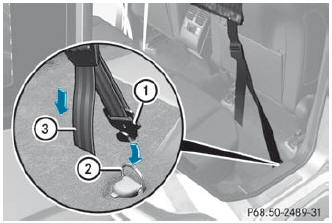
Seat belt reel holder behind the front seats
- Insert belt hook 1 into cargo tie-down ring 2 in the direction of the arrow.
- Pull tensioning strap 3 by the loose end in the direction of the arrow until the cargo net is tight.
- After driving a short distance, check the tension of the cargo net and retighten it if necessary.
Releasing the cargo net
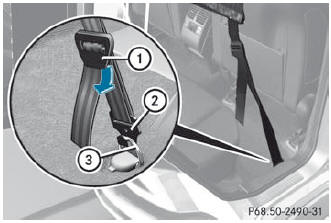
Seat belt reel holder behind the front seats
- Pull belt adjuster 1 upwards in the direction of the arrow to reduce the tension on the tensioning strap.
- Unhook belt hook 2 from cargo tie-down ring 3.
Detaching and storing the cargo net
- Detach guide rod 2 from bracket 1 ().
- Press the red button on the upper and lower guide rods.
- Fold the cargo net and roll it up.
- Close the two Velcro fasteners on the cargo net holder.
Coat hooks on the tailgate
![]() WARNING
WARNING
The tailgate may close if too great a load is placed on the coat hooks.
You and/or others could be trapped and injured.
Only use the coat hooks for light clothing.
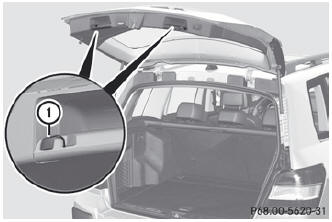
1 Coat hooks
Stowage well under the cargo compartment floor
![]() WARNING
WARNING
If items are stored in the compartment, make sure compartment is securely closed. In an accident, during hard braking or sudden maneuvers, they could be thrown around inside the vehicle, and cause injury to vehicle occupants.
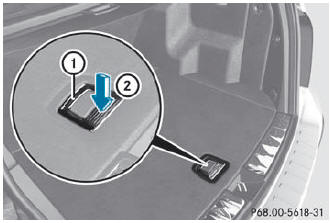
- To open: open the tailgate.
- Holding the ribbing, press handle 1 downwards 2. Handle 1 folds upwards.
- Swing the trunk floor upwards using handle 1 until it rests against the cargo compartment cover.
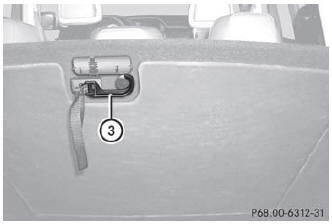
X Release hook 3 from the bracket on the underside of the trunk floor.
X Engage hook 3 into rain trough 4.
![]() Stowage compartments 5 and 6 can be used to stow small, light and flat objects.
Stowage compartments 5 and 6 can be used to stow small, light and flat objects.
![]() Before you close the tailgate, unhook the hook from the rain trough and fold
the trunk floor down.
Before you close the tailgate, unhook the hook from the rain trough and fold
the trunk floor down.
- To close: unhook hook 3 from rain trough 4.
- Fasten the hook to the bracket on the underside of the trunk floor.
- Fold the trunk floor down.
- Press the trunk floor down 2 until it engages.
Roof carrier
Important safety notes
![]() WARNING
WARNING
Only use roof racks approved by Mercedes- Benz for your vehicle model to avoid damage to the vehicle.
Follow the manufacturer's installation instructions. Otherwise, an improperly attached roof rack system or its load could become detached from the vehicle.
Do not exceed the maximum roof load of 165 lb (75 kg).
Take into consideration that when the roof rack is loaded, the handling characteristics are different from those when operating the vehicle without the roof rack loaded.
![]() Mercedes-Benz recommends that you only use roof carriers that have been tested
and approved for Mercedes-Benz vehicles. This helps to prevent damage to the vehicle.
Mercedes-Benz recommends that you only use roof carriers that have been tested
and approved for Mercedes-Benz vehicles. This helps to prevent damage to the vehicle.
Position the cargo on the roof rack in such a way that the vehicle will not sustain damage even when it is in motion.
Ensure that, depending on the vehicle's equipment, you can raise the panorama roof with power tilt/sliding panel fully and open the tailgate fully when the roof carrier is installed.
Attaching the roof carrier
- Secure the roof carrier to the roof rails.
- Observe the manufacturer's installation instructions.
 Loading guidelines
See also:
Indicator lamp, warning lamp, and information screen display list
Indicator and warning lamp list
1- Turn-signal indicator lamps/Hazard warning indicator lamps → P. 3-50. 2- High-beam
indicator lamp → P. 3-50. 3- Diesel preheat indicator lamp → P. 3-50. 4- Position
lamp indicator lamp ͛ ...
Service precautions
Adequate care of your vehicle at regular intervals serves to preserve the value
and appearance as long as possible. Maintenance items as described in this owner’s
manual can be performed by the owner. We recommend you to have the periodic inspe ...