 Mercedes-Benz GLK-Class: Lowering the vehicle
![]() WARNING
WARNING
Pump up the collapsible spare wheel before lowering the vehicle. You could otherwise damage the wheel rim.
- Place the ratchet wrench onto the hexagon nut of the jack so that the letters AB are visible.
- Turn the ratchet wrench until the vehicle is once again standing firmly on the ground.
- Place the jack to one side.

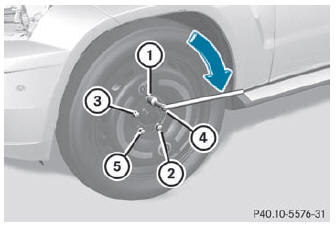
- Tighten the wheel bolts evenly in a crosswise pattern in the sequence indicated (: to A). The tightening torque must be 110 lb-ft (150 Nm).
![]() WARNING
WARNING
Have the tightening torque checked immediately after a wheel is changed. The wheels could come loose if they are not tightened to a torque of 110 lb/ft (150 Nm).
- Turn the jack back to its initial position and store it together with the rest of the tirechange tool kit in the cargo compartment.
- Transport the defective wheel in the cargo compartment.
For further information on stowing the collapsible spare wheel, see ().
![]() When you are driving with the collapsible spare wheel mounted, the tire pressure
loss warning system or the tire pressure monitoring system cannot
function reliably. Only restart the tire pressure loss warning system/tire pressure
monitoring system when the defective wheel has been replaced with a new wheel.
When you are driving with the collapsible spare wheel mounted, the tire pressure
loss warning system or the tire pressure monitoring system cannot
function reliably. Only restart the tire pressure loss warning system/tire pressure
monitoring system when the defective wheel has been replaced with a new wheel.
Vehicles with tire pressure monitoring system: all mounted wheels must be equipped with functioning sensors and the defective wheel should no longer be in the vehicle.
 Inflating the collapsible spare wheel
WARNING
Inflate the collapsible spare wheel only after the wheel is properly attached.
Inflate the collapsible spare wheel using the tire inflation compressor before lowering
the vehicle.
...
 Battery
...
See also:
Climate control air filter (in front of blower unit)
(If installed)
The climate control air filter is located in front of
the blower unit behind the glove box.
It operates to decrease the amount of pollutants
entering the car.
CAUTION:
o Rep ...
Service menu
In the Service menu you can:
call up display messages ()
restart the tire pressure loss warning system (Canada only) ()
check the tire pressure electronically (USA only) ()
call up the ser ...
