Mercedes-Benz GLK-Class: Engine compartment
Hood
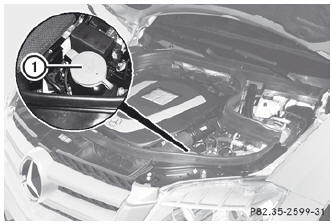
Opening the hood
![]() WARNING
WARNING
Do not pull the release lever while the vehicle is in motion. Otherwise, the hood could be forced open by passing air flow. This could cause the hood to come loose and injure you and/or others.
![]() WARNING
WARNING
Do not open the hood when the engine is overheated. You could be seriously injured. Observe the coolant temperature gauge to determine whether the engine may be overheated. If you see flames or smoke coming from the engine compartment, move away from the vehicle. Wait until the engine has cooled. If necessary, call the fire department.
![]() WARNING
WARNING
There is a risk of injury if the hood is open, even if the engine is not running.
Some engine components can become very hot.
To avoid the risk of burns, only touch those components described in the Operator's Manual and observe the relevant safety notes.
![]() WARNING
WARNING
To help prevent personal injury, stay clear of moving parts when the hood is open and the engine is running.
The radiator fan may continue to run for approximately 30 seconds or may even restart after the engine has been turned off. Stay clear of fan blades.
![]() WARNING
WARNING
The engine is equipped with a transistorized ignition system. Because of the high voltage, it is dangerous to touch any components (ignition coils, spark plug sockets, diagnostic socket) of the ignition system:
- with the engine running
- while starting the engine
- when the ignition is switched on and the engine is turned manually
- Make sure that the windshield wipers are switched off.
![]() WARNING
WARNING
The windshield wipers and wiper linkage could be set in motion.
When the hood is open, you or others could be injured by the wiper linkage.
Make sure that the windshield wipers are switched off. Remove the SmartKey or make sure that no ignition position has been selected with KEYLESS-GO. All indicator lamps must be off in the instrument cluster.
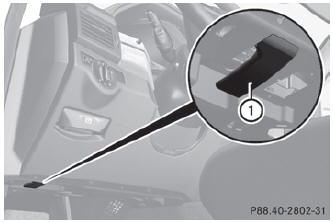
X Pull release lever 1 for the hood. The hood is released.
![]() Make sure that the windshield wipers are not folded away from the windshield.
You could otherwise damage the windshield wipers or the hood.
Make sure that the windshield wipers are not folded away from the windshield.
You could otherwise damage the windshield wipers or the hood.
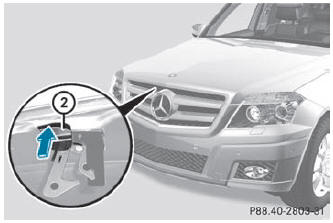
X Reach into the gap, pull hood catch handle 2 up and lift the hood. Once you have lifted the hood about 15 inches (40 cm), it is automatically opened the rest of the way and held open by the gas-filled struts.
Closing the hood
![]() WARNING
WARNING
When closing the hood, use extreme caution not to catch hands or fingers. Be careful that you do not close the hood on anyone.
Make sure the hood is securely engaged before driving off. Do not continue driving if the hood can no longer engage after an accident, for example. The hood could otherwise come loose while the vehicle is in motion and injure you and/or others.
- Lower the hood and let it fall from a height of approximately 8 inches (20 cm).
- Check that the hood has engaged properly. If the hood can be raised slightly, it is not properly engaged. Open it again and close it with a little more force.
Engine oil
Notes on the oil level
Depending on the driving style, the vehicle consumes up to 0.9 US qts. (0.8 l) of oil over a distance of 600 miles (1000 km). The oil consumption may be higher than this when the vehicle is new or if you frequently drive at high engine speeds.
Checking the oil level using the oil dipstick

- Park the vehicle on a level surface. To check the oil level with the engine at operating temperature, switch the engine off and wait for approximately five minutes.
- Pull oil dipstick 1 out of the dipstick guide tube.
- Wipe off oil dipstick 1.
- Slowly slide oil dipstick 1 into the guide tube to the stop, and take it out again. If the level is between MIN mark 3 and MAX mark 2, the oil level is correct.
- If the fuel level has sunk to MIN mark 3 or below, add 0.55 to 1.1 US qt (0.5 to 1.0 l) engine oil.
Adding engine oil
![]() WARNING
WARNING
If engine oil comes into contact with hot engine parts, it may ignite and you could burn yourself. Do not spill any engine oil on hot engine parts.
Environmental note
When adding oil, take care not to spill any. If oil enters the soil or waterways, it is harmful to the environment.
![]() Use only engine oils and oil filters that have been approved for vehicles equipped
with a service system. A list of the engine oils and oil filters tested and approved
in accordance with the Mercedes-Benz Specifications for Service Products can be
called up by visiting http://www.mbusa.com (USA only). More information about tested
and approved engine oils and oil filters is available from any authorized Mercedes-Benz
Center. Damage to the engine or exhaust system is caused by the following:
Use only engine oils and oil filters that have been approved for vehicles equipped
with a service system. A list of the engine oils and oil filters tested and approved
in accordance with the Mercedes-Benz Specifications for Service Products can be
called up by visiting http://www.mbusa.com (USA only). More information about tested
and approved engine oils and oil filters is available from any authorized Mercedes-Benz
Center. Damage to the engine or exhaust system is caused by the following:
- using engine oils and oil filters which have not been specifically approved for the service system.
- replacing the engine oil or oil filter after the replacement interval required by the service system has elapsed
- using engine oil additives.
![]() Do not add too much oil. If the oil level is above the "max" mark on the dipstick,
too much oil has been added. This can lead to damage to the engine or the catalytic
converter. Have excess oil siphoned off.
Do not add too much oil. If the oil level is above the "max" mark on the dipstick,
too much oil has been added. This can lead to damage to the engine or the catalytic
converter. Have excess oil siphoned off.
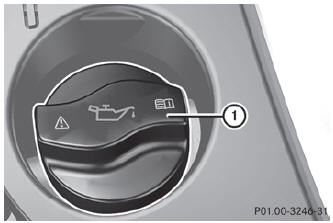
Example: engine oil cap
- Turn cap : counterclockwise and remove it.
- Add engine oil. If the oil level is at or below the MIN mark on the oil dipstick, add 0.55 to 1.1 US qt (0.5 to 1.0 l) engine oil.
- Replace cap : on the filler neck and turn clockwise. Ensure that the cap locks into place securely.
- Check the oil level again with the oil dipstick ().
Further information on engine oil ().
Checking and adding other service products
Checking the coolant level
Only check the coolant level when the vehicle is on a level surface and the engine has cooled down.
- Turn the SmartKey to position 2 () in the ignition lock. On vehicles with KEYLESS-GO, press the Start/Stop button twice ().
- Check the coolant temperature display in the instrument cluster. The coolant temperature must be below 158 F (70 C).
![]() WARNING
WARNING
In order to avoid any potentially serious burns:
- use extreme caution when opening the hood if there are any signs of steam or coolant leaking from the cooling system, or if the coolant temperature display indicates that the coolant is overheated.
- do not remove the pressure cap on the coolant reservoir if the coolant temperature is above 158 ‡ (70 †). Allow the engine to cool down before removing the cap. The coolant reservoir contains hot fluid and is under pressure.
- using a rag, slowly turn the cap approximately 1/2 turn to relieve excess pressure. If opened immediately, scalding hot fluid and steam will be blown out under pressure.
- do not spill antifreeze on hot engine parts. Antifreeze contains ethylene glycol which may burn if it comes into contact with hot engine parts.
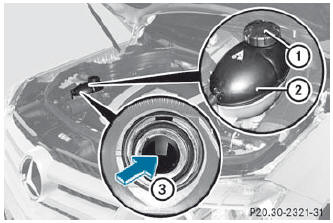
- Slowly turn cap 1 half a turn counterclockwise and allow excess pressure to escape.
- Turn cap 1 further counter-clockwise and remove it. If the coolant is at the level of marker bar 3 in the filler neck when cold, there is enough coolant in coolant expansion tank 2. If the coolant is approximately 0.6 in (1.5 cm) above marker bar 3 in the filler neck when warm, there is enough coolant in coolant expansion tank 2.
- If necessary, add coolant that has been tested and approved by Mercedes-Benz.
- Replace cap 1 and turn it clockwise as far as it will go.
For further information on coolant, see ().
Windshield washer system and headlamp cleaning system
The washer fluid reservoir is used for both the windshield washer system and the headlamp cleaning system.
![]() Vehicle components and their service products must match. You should, therefore,
only use products that have been tested and approved by Mercedes-Benz. Information
on tested and approved products can be obtained at any authorized Mercedes-Benz
Center or on the Internet at http://www.mbusa.com (USA only).
Vehicle components and their service products must match. You should, therefore,
only use products that have been tested and approved by Mercedes-Benz. Information
on tested and approved products can be obtained at any authorized Mercedes-Benz
Center or on the Internet at http://www.mbusa.com (USA only).
![]() WARNING
WARNING
Washer solvent/antifreeze is highly flammable. Do not spill washer solvent/ antifreeze on hot engine parts, because it may ignite and burn. You could be seriously burned.
![]() At temperatures below freezing: always fill the washer fluid reservoir with
a mix of water and windshield washer concentrate (e.g. MB WinterFit). There is otherwise
a risk of damaging the windshield washer system/headlamp cleaning system.
At temperatures below freezing: always fill the washer fluid reservoir with
a mix of water and windshield washer concentrate (e.g. MB WinterFit). There is otherwise
a risk of damaging the windshield washer system/headlamp cleaning system.
![]() Only use washer fluid concentrate which is suitable for plastic lenses. Unsuitable
washer fluid concentrate could damage the plastic lenses of the headlamps.
Only use washer fluid concentrate which is suitable for plastic lenses. Unsuitable
washer fluid concentrate could damage the plastic lenses of the headlamps.
![]() Do not add distilled or de-ionized water to the washer fluid container. Otherwise,
the level sensor may be damaged.
Do not add distilled or de-ionized water to the washer fluid container. Otherwise,
the level sensor may be damaged.
![]() Add windshield washer concentrate, e.g. MB SummerFit, to the washer fluid all
year round.
Add windshield washer concentrate, e.g. MB SummerFit, to the washer fluid all
year round.
Example: washer fluid reservoir
- Mix the windshield washer fluid in a container beforehand.
- At temperatures above freezing: fill the washer fluid reservoir with a mix of water and windshield washer concentrate (e.g. MB SummerFit).
- At temperatures below freezing: fill the washer fluid reservoir with a mix of water and windshield washer concentrate (e.g. MB WinterFit). Adapt the mixing ratio to the outside temperature. For information on the mixing ratio ().
- To open: pull cap 1 upwards by the tab.
- Add the premixed washer fluid.
- To close: press cap 1 onto the filler neck until it engages.
Brake fluid level
![]() If you notice that the brake fluid level in the brake fluid reservoir has fallen
to the MIN mark or less, check the brake system immediately for leaks. Also check
the thickness of the brake linings. Contact a qualified specialist workshop, e.g.
an authorized Mercedes-Benz Center immediately. Do not add brake fluid. This does
not correct the error.
If you notice that the brake fluid level in the brake fluid reservoir has fallen
to the MIN mark or less, check the brake system immediately for leaks. Also check
the thickness of the brake linings. Contact a qualified specialist workshop, e.g.
an authorized Mercedes-Benz Center immediately. Do not add brake fluid. This does
not correct the error.
Only check the brake fluid level when the vehicle is stationary and on a level surface.
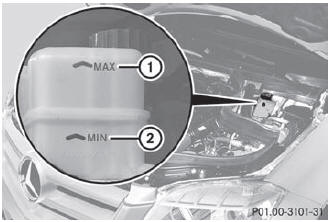
The brake fluid level is correct if it is between MIN marking 2 and MAX marking 1 on the brake fluid reservoir.
 Useful information
See also:
Seats, seat belts and Supplemental Restraint System
(SRS)
Seats, seat belts and Supplemental Restraint System
(SRS)
1. Supplemental front-impact air bags
2. Front seat-mounted side-impact supplemental air bags
3. Seat belts
4. Head restraints
— Front-seat Active Head Restraints
5. Roof-moun ...
Parking brake
To park the vehicle, first bring in to a complete stop, fully engage the parking
brake.
To apply
1- Pull the lever up without pushing the button at the end of hand grip.
To release
1- Pull the lever up slightly. 2- Push the button at the en ...