 Subaru Forester: Changing the oil and oil filter
Change the oil and oil filter according to the maintenance schedule in the ŌĆ£Warranty and Maintenance BookletŌĆØ.
The engine oil and oil filter must be changed more frequently than listed in the maintenance schedule when driving on dusty roads, when short trips are frequently made, or when driving in extremely cold weather.
NOTE
Changing the engine oil and oil filter
should be performed by a properlytrained
expert. It is recommended that
you have this service performed by
your SUBARU dealer.
1. Warm up the engine by letting the engine idle for approximately 10 minutes to ease draining the engine oil.
2. Park the vehicle on a level surface and stop the engine.
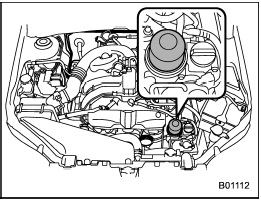
3. Remove the oil filler cap.

Turbo models

Non-turbo models
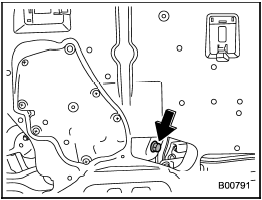
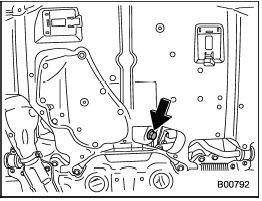
4. Drain out the engine oil by removing the drain plug while the engine is still warm. The used oil should be drained into an appropriate container and disposed of properly.

Be careful not to burn yourself with hot engine oil.
5. Wipe the seating surface of the drain plug with a clean cloth and tighten it securely with a new sealing washer after the oil has completely drained out.
6. Remove the under cover (turbo models).

Non-turbo models

Turbo models
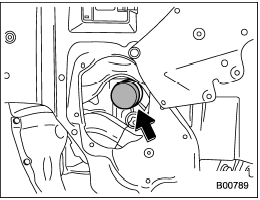
7. Remove the oil filter with an oil filter wrench.
8. Before installing a new oil filter, apply a thin coat of engine oil to the seal.
9. Clean the rubber seal seating area of the bottom of engine and install the oil filter by hand turning. Be careful not to twist or damage the seal.
10. Tighten the oil filter by the amount indicated in the following table after the seal makes contact with the bottom of engine.
Turbo models

Non-turbo models


- Never over tighten the oil filter because that can result in an oil leak.
- Thoroughly wipe off any engine oil that has spilled over the exhaust pipe and/or under-cover.
If spilled oil is not promptly wiped up, the oil could cause a fire.
11. Reinstall under cover (turbo models).
12. Pour engine oil through the filler neck.
For the oil capacity (guideline), refer to ŌĆ£Engine oilŌĆØ.
The oil quantity indicated above is only guideline.
The necessary quantity of oil depends on the quantity of oil that has been drained.
The quantity of drained oil differs slightly depending on the temperature of the oil and the time the oil is left flowing out. After refilling the engine with oil, therefore, you must use the level gauge to confirm that the level is correct.
13. Start the engine and make sure that no oil leaks appear around the filterŌĆÖs rubber seal and drain plug.
14. Run the engine until it reaches the normal operating temperature. Then stop the engine and wait a few minutes to allow the oil drain back. Check the oil level again and if necessary, add more engine oil.

Be careful not to spill engine oil when adding it. If oil touches the exhaust pipe, it may cause a bad smell, smoke, and/or a fire.
 Checking the oil level
Check the engine oil level at each fuel
stop.
1. Park the vehicle on a level surface and
stop the engine.
Turbo models
Non-turbo models
2. Pull out the level gauge, wipe it clean,
and in ...
 Recommended grade and viscosity
Use only engine oil with the recommended
grade and viscosity.
Refer to ŌĆ£Engine oilŌĆØ.
NOTE
Engine oil viscosity (thickness) affects
fuel economy. Oils of lower viscosity
provide bette ...
See also:
Scanning
SCAN automatically searches through the list
of satellite channels. The search will only be
carried out in the selected category, see
page 215 for more detailed information on the
scan functio ...
Ignition Off Operation
For vehicles not equipped with the Electronic Vehicle
Information Center (EVIC), the power sunroof switch
will remain active for 45 seconds after the ignition switch
is turned to the LOCK positi ...
Air Conditioner Maintenance
For best possible performance, your air conditioner
should be checked and serviced by an authorized dealer
at the start of each warm season. This service should
include cleaning of the condenser ...
