Volvo XC60: Cargo area
Steel cargo grid
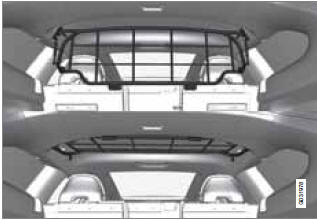
Your vehicle can be equipped with a steel grid that helps prevent objects in the cargo area from moving forward into the passenger compartment.
Folding the grid up/down
Grasp the lowering edge of the grid and pull it rearward/upward, or push it downward/forward.
NOTE
If the steel grid is to be used with the
optional cargo area cover, the grid must be
folded down before the cargo area cover is
put in place.
Installing the steel cargo grid
For information about the necessary tools and procedures for installing/removing the steel cargo grid, please refer to the assembly instructions that were included when the grid was purchased.
Cargo area cover
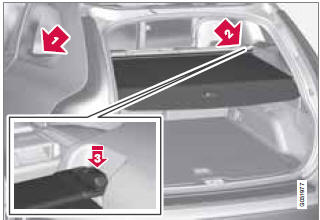
Use
• Pull the cover over the cargo and hook it into the holes in the rear cargo area pillars.
• To retract (roll up) the cover, release it from the holes and guide it toward the rear seat backrest.
Installing the cover
1. Press the end piece on one side of the cargo area cover into the retaining bracket in the side panel of the cargo area 1.
2. Do the same on the opposite side 2.
3. Press both sides of the cover until they click into place 3. The red mark will no longer be visible.
4. Check that both ends of the cover are securely locked in place.
Removing the cover
1. Press one of the end pieces of the cover inward.
2. Pull the cover carefully upward and outward.
The other end will release automatically from its retaining bracket.
Folding down the cargo area cover's rear flap
The cargo area cover's rear flap points horizontally when the cover is retracted (rolled up).
To fold it down:
- Pull the flap slightly rearward past its supports and fold it down.
NOTE
On models equipped with this cover, it
should be removed before a child seat is
attached to the child restraint anchors.
Cargo net

Cargo net mounted in rear position
Your vehicle can be equipped with a cargo net made of strong nylon fabric that helps prevent objects in the cargo area from moving forward into the passenger compartment.
The net can be attached in two different places:
• Rear position: behind the rear seat backrest
• Front position: behind the front seat backrests
WARNING
• Be sure that the cargo net's upper
attachment hooks are properly inserted
in the brackets and that the lower straps
are correctly attached and pulled taut.
• A damaged cargo net should never be
used.
• Objects in the cargo area should be
securely anchored, even if the cargo net
is correctly installed and in use.
Mounting the cargo net
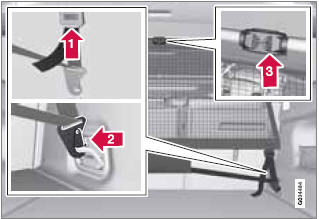
The cargo net is easiest to put in place through one of the rear doors.
1. Fold out the cargo net and be sure that the upper hinged rod is straight and locked in position.
2. Insert one end of the rod into the front or rear bracket (near the ceiling). Be sure that the lock on the lower strap is facing toward you.
3. Insert the other end of the rod in the opposite bracket.
– Be sure to press the end hooks on the rod as far forward as possible in the brackets.
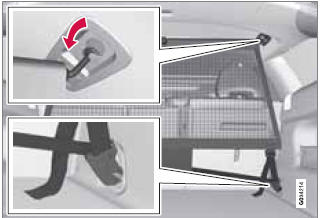
Cargo net in rear position
4. Mounting in the rear position: With the net's rod attached to the rear upper brackets, hook the lower straps in the floor eyelets in the cargo area. Pull the net strap taut.
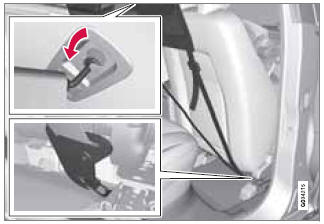
Cargo net in front position
Mounting in the front position: With the net's rod attached to the front upper brackets, hook the lower straps in the eyelets in the front seat rails. Attaching the net is easier if the front seat backrests are upright and the seats are moved slightly forward.
If the front seats are moved rearward, they should not press hard against the net.
CAUTION Pressure from the front seats against the cargo net could damage the net and/or its brackets.
5. Pull the net strap taut.
Removing and storing the cargo net
- Press the release buttons on the locks on the straps and pull out a small section of the strap.
- Press in the catches on the straps' hooks and remove the hooks from the eyelet.
- Fold up the net's rod at the center and roll up the net.
When not in use, the cargo net can be stored under floor of the cargo area.
 Loading
See also:
Temporary spare tire (if equipped)
When a spare tire is mounted or a
wheel rim is replaced without the
original pressure sensor/transmitter
being transferred, the low tire pressure
warning light will illuminate
steadily after blinking for approximately
one minute. This ...
Electronically controlled 4WD system
The electronically controlled 4WD system is an 4-wheel drive system that allows
one of three drive modes to be selected with a switch, in accordance with the driving
conditions. The following drive modes are available.
4-wheel drive operation ...