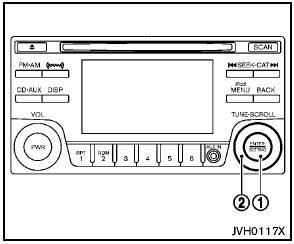
 Nissan Rogue: Audio main operation
Head unit:
The auto loudness circuit enhances the low and high frequency ranges automatically in both radio reception and CD playback.
PWR/Volume control:
Place the ignition switch in the ACC or ON position, and then push the PWR button while the system is off to turn on the last audio source, which was playing immediately before the system was turned off. While the system is on, pushing the PWR button turns the system off.
Turn the VOL control knob to adjust the volume.

SETTING button:
The settings screen will appear when pushing the SETTING button.
The following items are available in the settings screen.
- Bass, Treble, Balance and Fade Controls the sound of the audio system.
Balance adjusts the sound between the left and right speakers. Fade adjusts the sound between the front and rear speakers.
Select the "Bass", "Treble", "Balance" or "Fade" using the TUNE·SCROLL control knob and then push the SETTING button.
Turn the TUNE·SCROLL control knob to adjust the Bass, Treble, balance and Fade of the screen to the preferred level.
- Speed Sens Vol.
To change the Speed Sensitive Volume (Speed Sens Vol.) level from off (0) to 5, turn the TUNE·SCROLL control knob.
- AUX Vol.
Controls the volume level of incoming sound when an auxiliary device is connected to the system. Choose a setting between 1 and 3 or choose 0 to disable the feature entirely.
- Brightness and Contrast Adjust the brightness and contrast of the screen.
Select the "brightness" or "contrast" using
the TUNE·SCROLL control knob and then
push the SETTING button. Turn the TUNE
·SCROLL control knob to adjust the
brightness and contrast of the screen to
the preferred level.
- Clock Adjust Adjust the clock according to the following procedure.

1) Push the SETTING button 1 until “Setting Clock” and “Clock Adjust” appear on the display.
2) Turn the TUNE·SCROLL control knob 2 to adjust the hour.
3) Push the SETTING button 1 .
4) Turn the TUNE·SCROLL control knob 2 to adjust the minute.
5) Push the SETTING button 1 .
- On-Screen Clock
When this item is turned on, a clock is
always displayed in the upper right corner of
the screen.
Select the "On-Screen Clock" using the TUNE·SCROLL control knob and then push the SETTING button. You can toggle between ON and OFF using the TUNE·SCROLL control knob.
- RDS Display
When this has been set to ON, RDS (radio
data system) information will be shown on
the display. Select RDS Display and then
push the SETTING button. You can toggle
between ON and OFF using the TUNE·SCROLL
control knob.
- iPod Menu language
The iPod menu language can be set to
English, French or Spanish.
Select iPod menu language and then push the SETTING button. Use the TUNE·SCROLL control knob to select the preferred language.

DISP button:
Display of the screen can be canceled by pushing the DISP button. You can then listen to music that is being played back. If you want to display the screen again, either push the DISP button once more or push the FM·AM, XM or CD·AUX button.
Switching the display:
- Models with satellite radio
Pushing the CD·AUX button will switch the
displays as follows:
CD  iPod®/USB
 AUX
AUX
 CD
CD
- Models without satellite radio
Pushing the AUX button will switch the
displays as follows:
iPod®/USB  AUX
AUX
 iPod®/USB
 FM-AM-SAT(if so equipped) radio with Compact Disc
(CD) player (Type A)
FM-AM-SAT(if so equipped) radio with Compact Disc
(CD) player (Type A)
1. FM·AM band select button
2. CD EJECT button
3. DISP (display) button
4. Color display
5. iPod® MENU button
6. ...
 FM-AM-SAT(if so equipped) radio operation
radio (FM/AM) band select:
Pushing the radio band select button will
change the band as follows:
AM FM1
FM2
AM
radio (SAT) band select (models with
satellite radio):
Pushing the XM b ...
See also:
Economical driving
For economical driving, there are some technical requirements that have to be
met. The prerequisite for low fuel consumption is a properly adjusted engine. In
order to achieve longer life of the v ...
Satellite Radio
For vehicles equipped with the MyLink or IntelliLink infotainment system, see
the separate MyLink/ IntelliLink Features and Functions Guide for more information.
Vehicles with an XM™ Satellite Ra ...
Backing up behind a projecting object
Backing up behind a projecting object
The position C is shown further than the
position B in the display. However, the
position C is actually at the same distance
as the position A . The vehi ...
